Friday 25 November 2016

Windows 10 – How To Change The Default Application To Open Files

Windows 10 – How To Change The Default Application To Open Files

Some type of files, in our system, can be opened with more than one application. If your computer is a typical one, then different applications can open the graphical files and sometimes when you open a file, it opens in the wrong application.

Windows 10 is assigned to open the files with its default applications and the following steps will guide you to change the default application to open files of certain type.


1. Open Control Panel.
2. In Control Panel, choose Programs.
3. From Programs window, choose Default Programs
4. Click Associate a file type or protocol with a program.


5. Set Associations window opens. This window lists the file extensions by which different file types can be identified.


6. In the Name column, scroll and select the file type you are concerned with. For example, if you want to change the application with which Windows 10 opens JPEG files, scroll to and select the JPEG file extension.
7. Click Change program button. A window appears with a list of applications on your computer that can open files of the type you selected.
8. Select your first-choice of application for opening files to this type and then select the OK button.

Sunday 20 November 2016

Windows 10 - Switch Airplane Mode

 Windows 10 - Switch Airplane Mode

Most people enjoy working with their tablets or laptops during a long flight, and you can do so in Airplane mode in Windows 10. Portable devices are great for watching movies and playing games while pretending to catch up on some work. But most airlines alert you turn off your wireless connection while the plane is in flight, referred to in airport lingo as Airplane mode.

Follow these steps, to turn on Airplane mode: 
  1. Click or tap the Action Center icon, which is near the clock in the screen’s bottom-right corner. The Action Center pane appears.

2. The Action Center pane, normally, shows four buttons along its bottom edge; click or tap Expand that reveals a row of hidden additional buttons.

3. Now click or tap Airplane mode icon. When the button is highlighted, Airplane mode is on, which turns off your device’s radios – such as Wi-Fi, Bluetooth and GPS.

To turn off Airplane mode and reconnect to the internet, repeat these steps. This time, however, you toggle off Airplane mode, which reactivates your Wi-Fi, Bluetooth and GPS.

Airplane mode not only puts your tablet and laptop in compliance with airline safety rules, but it conserves battery life, as well. Feel free to keep your computer in Airplane mode even when you’re not on an airplane.

Airplane mode turns off not only your computer’s wireless but its cellular gear, as well, if you have a cellular data plan. It’s a handy way to shut off all your computer’s radio activity with one switch.

Thursday 17 November 2016

Windows 10 - How To Open A Second Or Third Desktop Tile

Windows 10 - How To Open A Second Or Third Desktop Tile

Open a second or third desktop that avoids your screen from getting crowded with too many open windows. Opening another desktop is like having another computer screen! 
The way explained here is to stay organized in your work and reduce clutters of the screen. So, you may open the files that related to one project on one desktop then open another files related to second project on another desktop and so on. 
Following steps will guide you to open another desktop(s) on your screen.
1.     Just click over Task View button from task bar or press Windows key + Tab or swipe from the left edge of the screen. Now thumbnails for the open windows will be appeared with New Desktop button at below right of the screen and desktop tiles named as Desktop 1, Desktop 2 as well. 
2.     Note that Desktop 1 will be the first tile, where you’ve run (and kept) the applications and files, already.   If you want to open (and work on) Desktop 2 (tile), then click on it to open and work with your applications or files.     
3.      If you want to work on a new desktop then click New Desktop button. From there you can open the applications and files, again.
4.     If you want to return Desktop 1 (tile), click again on Task View button then choose Desktop 1.
5.     To close a desktop tile, just move the cursor or your finger on the desired desktop, and click or tap when the Close button appears. Closing a desktop tile means, all of its open applications or files will be moved to their original location of the system.

Tuesday 15 November 2016

Windows 10 - Manage Your Passwords

Windows 10 - Manage Your Passwords

Passwords may be unnecessary for home using computers unless you'd like to keep someone else in your house out of your business! Laptop users should always create a password that should be harder and not easy for a thief. 
Windows 10 offers two type of passwords, if you prefer not to enter a password when turn on your computer and you can start Windows 10 with entering a password.

 The two types of passwords are:  
  • Microsoft Account Password: This type of password is to secure your computer plus enjoy the  advantages of Windows 10 features - like Apps from Microsoft Store, OneDrive for online storage and sync (settings) between computers.
  • Local Passwords: This type is normal, which also secures your computer against unwanted entry.  
How to handle Passwords (Windows 10):
From Start screen ... select your name, then choose Change account settings from the drop-down menu. The Accounts screen will be opened, and from here you can manage password options.


  • How to change your local account to a Microsoft Account: From Your Info screen, click Sign in with a Microsoft Account instead. Now from the following screen enter e mail address and password for your Microsoft Account then click Sign in button. From the following screen, enter your current Windows password and select the Next button.
  • How to convert your Microsoft Account to a Local Account: From your Account screen, select Sign in with a local account instead. As security reason, you may asked to enter your Microsoft Account password and Windows 10 may ask you to verify your identity, to Microsoft, by submitting a security code. Now enter your e mail address and click Next. Go to your e mail and get the security code then enter it in the Enter the code screen. Now Switch to a local account screen will appear. Negotiate the screens then enter your user name, password (twice) and password hint for your local account.
  • How to start Windows 10 without entering a password: From the Accounts screen, click Sign-in options. Under Password, select Change button. Now Change your password screen will appear. Enter your password and select Next. In the following screen, leave all boxes as blank and select Next then select Finish.

How To Identify If Your Room-mate Is Using Your Computer

How To Identify If Your Room-mate Is Using Your Computer


Room-mates, they eat your food, wear your cloths, and snore really loudly! Sometimes, opportunities allow them to use your computer when you’re not around. If you suspect that your laptop or desktop being used by him, and you probably have a password for your lock screen but you’ve some reason to trust him who has guessed your password or somehow circumvented it in the recent past. Now it’s the time to start changing the password regularly! (And make it stronger). 

This article will explain you ‘how to sleuth-out trespassing room-mates, parents and even pesky little sisters’. 

Check your logs:
Almost every personal computer keeps a log event, a literally list, of every action that you’ve performed with time-stamped. So, you can see when each action occurred. The easiest way, to catch a suspected unauthorized user, is to put your computer in “sleep” when you leave, then check “wake” log events when you get back. 


This means, if the computer was woken-up during your absent, then you may see the extra/other activity too. Just study the logs and see if any extra activity occurred or not. Just think back to the time when you weren’t at your computer then see the logged events for the absent time, and make confirm that somebody is using your machine.

For Windows users, open the Event Viewer. Look for the Windows Log menu item on the right. Right click on Systems, and you’ll see all activity on your computer.
For Mac users, look for the Console App, which you can use to view your logs. When it opens, you’ll see “All Messages,” and you scroll up to go back in time. 

Check Your Browser History:
Smart people, in fact, delete their history, when they browse something in a web browser. But your room-mate may not be smart or maybe he’s smart enough to delete his digital bread-crumbs, and not smart enough to selectively delete them—so instead of just deleting his activity for the last hour, he deletes everything that includes all your past activities! So, no records will be showing to identify the dirty one. If there’s no suspicious browser activity, it doesn’t absolve your suspect. They could just be savvy enough to either delete only their own activity or use a private browser session. In this case, try setting up OpenDNS, a web service, which is free for personal use and it logs every web URL visited from your home network.

Software Solutions:
If your roommate is smart enough, they will get past all of those logs. But if you want to catch somebody in the act, you can leave your password unchanged and set a trap for them. The App Prey can help you to catch them and this software can track multiple devices, including Macs, Windows PCs, Android phones, and iOS devices. The software can tell where the device is located, lock the screen, send alert messages and even take a snap of the person using your device. There’s a free version, but other versions with more robust features cost money. You can also check out Keylogger Apps, which will capture any keys that are pressed on your keyboard. Try Revealer Keylogger for Windows or Elite Keylogger for Macs.

Cameras Won’t Lie:
Another option is a secret web-cam, if you dare to be extreme! In markets, more popular indoor security cam is available and they allow you to view a live-stream, even on your phone. When installing it, don’t place it anywhere near your computer—that would be too obvious. Hide it within a crowded bookshelf, inside a stuffed animal, or somewhere creative.

Monday 14 November 2016

Windows 10 – Event Viewer

Windows 10 – Event Viewer 


Every user of Windows-10 needs to know about Event Viewer. In fact, Windows has an Event Viewer for almost a decade. Few people know about it. At its heart, the Event Viewer looks at a small handful of logs that Windows maintains on your PC. The logs are simple text files, written in XML format.
Windows having many Event Log files: Administrative, Operational, Analytic, and Debug, plus application log files.
Every program that starts on your PC posts a notification in an Event Log, and every well-behaved program posts a notification before it stops. Every system access, security change, operating system twitch, hardware failure, and driver hiccup all end up in one or another Event Log. The Event Viewer scans those text log files, aggregates them, and puts a pretty interface on a deathly dull, voluminous set of machine-generated data. Event Viewer is a database reporting program, where the underlying database is just a handful of simple flat text files.
Here’s how to use the Event Viewer: 
1. Right-click (or tap and hold) the Start icon. Choose Event Viewer.  

2. The Event Viewer appears.
3. On the left, click Event Viewer > Custom Views > Administrative Events. 
It may take a while, but eventually you see a list of notable events like the one shown. 
Don’t panic for its abnormal indications. Even the best-kept system boasts reams of scary-looking error messages — hundreds, if not thousands of them. That’s normal. 
See the table for a breakdown.
Events and What They Mean
Event
What Caused the Event
Error
Significant problem, possibly including loss of data
Warning
Not necessarily significant, but might indicate that there’s a
problem brewing
Information
Just a program calling home to say it’s okay

The Administrative Events log isn’t the only one you can see; it’s a distillation of the other event logs, with an emphasis on the kinds of things a mere human might want to see.
Other logs include the following:
  • Application events: Programs report on their problems.
  • Security events: They’re called “audits” and show the results of a security action. Results can be either successful or failed depending on the event, such as when a user tries to log on.
  • Setup events: This primarily refers to domain controllers, which is something you don’t need to worry about.
  • System events: Most of the errors and warnings you see in the Administrative Events log come from system events. They’re reports from Windows system files about problems they’ve encountered. Almost all of them are self-healing.
  • Forwarded events: These are sent to this computer from other computers.

Wednesday 9 November 2016

Pocket - Overview

Pocket - Overview


Pocket (previously known as ‘Read It Later’) is an interesting and amazing App, founded in 2007 by Nate Weiner, to help people save articles, videos and more from the web for later enjoyment. 

Once saved to Pocket, the list of content is visible on any device — phone, tablet or computer. It can be viewed while you’re waiting in line, on the couch, during commutes or travel — even offline. 

It is one of the leading (save for later reading) service, in tech world, which has more than 22 millions of registered users, and integrated into more than 1500 Apps including Flipboard, Twitter and Zite. 

It is available for major devices and platforms such as Windows, Edge, Chrome, Firefox, Safari, Opera, Android, Mac, iPhone, iPad, Kindle Fire, and Kobo. 

So, it’s easy to access to read, even offline, from any device after saving on Pocket.


No matter! What device are you using?

Just click the each link to know more about Pocket!

· Desktop or Laptop computer

· iPhone or iPad

· Android or Kindle Fire device

You can download the App from here: Pocket

Saturday 10 September 2016

How To Protect Yourself If Anyone See Your Entire Google Search History

How To Protect Yourself If Anyone See Your Entire Google Search History

Every single search that you’ve ever made on Google and every page you’ve ever visited has also been stored in Google’s Servers. Did you think that the option: “Clear Browser History”, will be wiped out any evidence of you being on the web? Then note again, all those buttons does is to clear the data from your system – not Google’s.

How to see your entire Google search history: 
The entire history of your Googled content is there and anyone can see, if they know ‘where to look’. If you’re using a shared machine, learn how to disable this alarming functionality and keep your searches private. You still can’t stop Google from gathering that information but you can definitely protect your local system from prying eyes. Finding these data is the simplest of tasks. 

On your browser, click on the three vertical bars at the right of your address bar and select “History –> History”. You can go back as far as you like and see what you’ve been searching for ever since you first signed into your Google account on that machine.

Alternatively, visit this URL: http://history.google.com/history, from your machine, which is great if you want to remember something you searched in the past – but couldn’t find later, or if you just have a half day to waste going through a list that might just make you go - “huh, when did I search for that!” 
But remember it’s not so great, if someone else is using your PC, laptop, tablet or even smartphone. And the problem is exacerbated by the fact that Google can sync (on your command, of course) your browser data with any device that you’ve signed into your Google account on. 

How to delete your browsing history: 
So what do you do if you want to delete everything? That’s also very simple. Just go to Settings, click on the Advanced Settings link at the bottom, scroll down to Privacy and click on Clear Browsing Data. When you get the pop-up window, select everything you want to erase and the timeline you want erased and hit the Clear Browsing Data button in the pop-up.

In a flash, it’s gone - only from that device. If your data may synced with other devices where you’re signed in to the same account, then be sure to check all those devices to see, whether the history deletion has indeed taken effect or not.

Safeguard Future Searches:
Follow these steps to prevent your future activities from being tracked:  
Again, go to Settings, click on the Advanced Settings link and go to Privacy, but this time click on the Content Settings button. 
Within Content Settings, select everything you want to block, create exceptions to the rule if required, and click Done when you’re finished.


Similar settings are also available on other versions of popular browsers including  Internet Explorer, Mozilla Firefox, Safari, Opera and UC Browser.


A Warning:
Your Internet Service Provider (ISP), browser provider and many of the other sites you use have every capability to track your activity on the internet despite what your settings tell you. Even you use, for example, Incognito on Chrome and think you’re safe, but you’re not 100% protected from everyone.

To prevent websites from tracking your activity on the internet, you can use a service such as disconnect me or use any premium Virtual Private Network service for a few bucks a month. But be warned that your data is never 100% safe. And keep in mind that large companies spent billions of dollars each year over cyber security.

A complete insulated environment is impossible to achieve unless you’re completely unplugged from the internet – an impractical situation at best. The next, best thing is to be aware of the risks and protect yourself from the most obvious security breaches.

These settings and tools are there to protect your system from local snoopers – not necessary the ones online that start getting your data the moment you log in. So be aware of this lack of privacy when using the internet and behave accordingly.

Thursday 8 September 2016

Three Types Of App: Keep Your Services In One Convenient Place To Make Your Life Easier

Three Types Of App: Keep Your Services In One Convenient Place To Make Your Life Easier

Using some Apps, which keep all your services – between FB messenger, WhatsApp, SKYPE and every other social media or chat – in one convenient place to track them and make life easier for you!

Here we are showing you three type of Apps, which are popular in services and come along with FB messenger, WhatsApp, SKYPE and many more.
 
1. All-in-On
e Messenger It’s for Chrome users and can be downloaded from their web store. Once you installed this application, on your system, which combines chat and messaging services into one simple way. It has 29 services and you can choose them as you want to authorize then enable desktop notifications.

Each service stays in its own tab and possible to use multiple accounts at the same time. It also has the nice benefit to prevent cross-domain tracking where you’ve to be logged-in with the main browser.
This is practically useful for those who always sitting on their desktop or laptop.
 
2. Franz It’s a desktop messaging App, which combines chat and messaging services into one application. It supports many services such as WhatsApp, FB messenger, Telegram, SKYPE, Slack, Google Hangout etc., It can be downloaded on your desktop and available for Windows, Mac and Linux.

It looks similar to All-in-one messenger and works the same way as of All-in-one messenger. 
Each of its service can be viewable on its own tab and you can see your contact list too. It allows you to enable or disable the notifications for each service.

3. Rambox It’s a desktop App for messaging and e- mailing that gives a new way to organize your services, especially to the people who work with many services for business and private. This App is available for Windows, Mac and Linux. 
It supports 48 services, while it looks somewhat different from All-in-one and Franz, but has the same tabbed layout with the ability to enable desktop notifications.
It gives users more choices, such as: add custom services, sync services, locking and etc., in a natural way to anyone, who is on a busy life.

Friday 19 August 2016

How to Install Android Apps on SD Card, by Default & Move Almost Any App to the SD Card

How to Install Android Apps on SD Card, by Default & Move Almost Any App to the SD Card


By default, Android Apps will be installing on the device storage of your smart phone; but the trick explained, in this article, is to set the SD card as your default installation location. This trick is allowing you to move, almost, any App to the SD card and no root access is required. And this tweak requires Android 2.2 or later.

To change the default installation location, you should have to use Android Debug Bridge (ADB) utility, a tool-kit, included in the Android Software Development Kit (SDK), which available with Google's Developer Console.

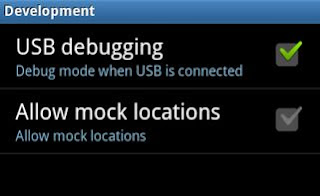
Enable USB Debugging: First, you've to enable USB debugging on your Android device. Open Settings > Applications or Developer options > USB Debugging.

Tap the USB debugging check-box to enable it. This will enable debug mode, allowing you to change the settings on your Android device from your computer. You should have to disable debug mode after completing this process.
Install the Android SDK: Now download and install Google’s Android SDK on your computer. If you don’t already have Oracle’s Java JDK installed on your computer, you’ll have to download and install it before installing the Android SDK. After you’ve installed both the JDK and Android SDK, launch the SDK Manager from your Start menu.
The ADB utility doesn't installed by default. This utility is included in the Android SDK Platform-tools package; so, select this package and click the Install button to download and install it.
When the process completes, connect your Android device to your computer with its included USB cable. Windows should locate the device and install the appropriate drivers, automatically. If it doesn’t, you may have to download and install the appropriate drivers from your Android device’s manufacturer. Do not mount the device after connecting it – just plug it in.

Using ADB: Open Windows Explorer window and navigate the folder .... android-sdk\platform-tools

On Windows, you’ll find this folder at C:\Program Files (x86)\Android\android-sdk\platform-tools, by default.

Check C:\Program Files\Android\android-sdk\platform-tools, if you’re using a 32-bit version of Windows.

Now launch a Command Prompt window in this folder by pressing and holding the Shift button, right-clicking in the folder, and selecting Open command window here.
Run the adb devices command and you should see your connected Android device.
Run the following command to set the default install location to your SD card:
If you want to revert this change later and install apps to the internal storage by default, run this command:
2 represents the external storage, whether it’s an SD card or USB storage and 0 represents your device’s internal storage, which is default.


Moving Apps to SD Card:
Apps that refused to leave your system storage can now be moved to the external storage. For instance, below you’ll see screenshots of the Slacker Radio app. Before the change was made, the Move to USB Storage button was grayed out. After the change was made, the button is enabled and the app can be moved.


To move an App to the SD card, open the Settings screen, tap Applications, and select Manage Applications. Select the App you want to move and tap the Move button on its details screen.

A Warning: 
Some Apps shouldn’t be installed to your SD card and they remain installed on the internal storage. The external storage is unavailable when your Android device is mounted on your computer, so Apps that remain running all the time should be left on your internal storage. Widgets, launchers, animated wallpapers, and anything you want to use while your Android’s SD card is mounted on your computer should be left on the internal storage.

Tuesday 16 August 2016

Understanding Basic Image File Formats- JPEG, PNG, TIFF, GIF

Understanding Basic Image File Formats

We've witnessed a wide range of file formats across our screen; but do you really understand what they mean? For instance, you may know that a JPEG is for pictures; but how about a PNG and a TIFF? And which type of format supports an image with a see-through background?
This article will explain to those questions and even more! 

JPEG is developed by 'Joint Photographic Experts Group', which supports a wide range of colors; so, it's the one most folks capturing on digital cameras and scanners. JPEG is the most common format, as well, for storing and transmitting photographic images on the World Wide Web

JPEG can be compressed to a smaller file size, which maximizing the space of camera's memory card. It also works excellent for black and white photos. Its images can be posting online and sharing via e mails. In fact, a JPEG saved at the highest quality from your scanner, which is indistinguishable from a TIFF.

JPEG is not suited to the files, which undergo multiple edits, as its quality of image will usually be lost each time when the image is decompressed and re-compressed, particularly if the image is cropped or shifted. To avoid this, an image that is being modified or may be modified in the future can be saved in a lossless format, such as TIFF, GIF, PNG, or a raw image format. The JPEG standard actually includes a lossless coding mode, so the mode is not supported in most products of JPEG.

TIFF, Tagged Image File Format, is a flexible, adaptable file format for handling images and data. Unlike JPEG files, a TIFF file using lossless compression when a image may be edited and re-saved without losing image quality. It's the gold-standard in printing with high-quality images, which is always as pristine like the original.
TIFF originally gained popularity as a scanning format and designers used to rely on TIFF. Nowadays pro-level page layout Apps can be used native Photoshop files, which has all the quality of a TIFF at a smaller file size. If you’re sending an image to someone else for inclusion in a printed book, brochure or magazine, you could send a high quality JPEG; however, to be super safe, send an uncompressed TIFF. 

PNG, Portable Network Graphics, is the most used lossless image compression format; so, you don't lose any image detail. It supports a wide range of colors and transparent backgrounds. As a result, it produces higher-quality images than JPEG format, but the file sizes are bigger. Unlike JPEG, the PNG format keeps text and logos crisp when posting online, which is handy for social media cover images. 

PNG comes in two flavors: PNG8 and PNG24. The later, PNG24, supports more colors and partially transparent pixels, which is crucial if you’ve added a drop shadow to an image with a transparent background or when the image you want to post online includes a large gradient (a smooth transition from one color to another). The other uses high quality graphics and post highly detailed images to online photography.
PNG is better for high quality full color images with a transparent background (checkerboard pattern in Photoshop denotes transparency). 

GIF, Grafic Interchange Formate, is perfect for the images of web graphics or logos. It produces small file size with limited number of colors and transparent background. It's file format is not as popular as it used for static graphics, but still widely used for animated graphics on web.
The image on the left is perfectly suited for a JPEG; but the two on the right are perfectly suited for GIFs.

PSD, Photo Shop Document, is the native format of Adobe Photo Shop and this format supports layers (enabling to image adjustments), graphic elements and text that can be stored inside a single document. Saving your file in PSD format keeps your layers intact; so, you may protect your original image and you can continue to edit the document whenever you need. Sometimes, it stands for PSB, Photo Shop Big, which extends the PSD file format to maximum height and width to 300,000 pixels and the length to around 4 Exabytes. Because of Photoshop's popularity, PSD files are widely used to extent some competing software. 


PDF, Portable Document Format, is very popular for sharing single and multi page documents to view and print. Saving a file in this format is just taking a picture of the file, which included the text, fonts, graphics, videos. So, it looks just like the original in displaying and this format can be opened and printed by most of every computer. PDF files can be compressed and it is often preferred by printing companies for stuff like invitations, business cards, brochures and etc., We can generate a high quality PDF from anything and this format is easy to sharing with others.

The BMP file format, also known as Bit Map Image file, is a popular graphics file format used to store bit map digital images especially on Windows based PC's.

While there are many more formats, but above indicated are the most common in use and hope the creative force be with you all!

Tuesday 12 April 2016

The History: Back Slashes and Forward Slashes

The History: Back Slashes and Forward Slashes

Have you ever noticed that 'why Windows uses back-slashes for paths, while everything else seems to use forward-slashes'?

In Windows, C:\Windows\ (back-slashes) and everything others, http://portonovocomputertech.blogspot.com/ on web, and /home/user/ on Linux, OS X, and Android (forward-slashes).

And it doesn't matter what type of slash you use, but the modern software, automatically, tries to correct when you type a wrong slash! 

The History: 
Why Windows uses back-slashes?  
It’s all around a few accidents of history, which happened decades ago.

Unix has introduced the forward slash character ( / ) as it's directory separator in 1970's. And we don’t, really, know 'why they chose this character', but that’s the one they picked. 

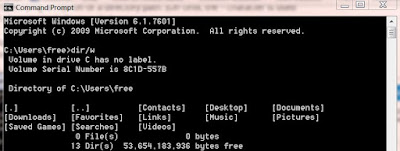
The original version of MS DOS 1.0 did not supporting directories at all, when it was released in 1981. Most of it's utilities were written by IBM, and they used the / character as a 'switch' character. We can, even, see this character today in the command prompt, i.e., to run the command dir/w tells the directory command to run with wide list of format option, while run the command  dir c:\ tells  the directory command to list the contents of drive C:\.  The different types of slashes here indicate whether you’re specifying an option or a directory path. 

MS-DOS 2.0 introduced support for directories, but IBM wanted to keep compatibility with the original DOS utilities and other programs that expected the / character to be used for switches. Microsoft had already used the / character, so they couldn’t just re-use it. They ultimately chose the \ character instead, as it was the most similar-looking character visually.

Windows may not be built on top of DOS anymore, but you can still see the legacy of DOS throughout Windows in the way backslashes and other features like drive letters are used for the file system.

Many of these details are from Microsoft employee Larry Osterman’s weblog, which contains more detailed information from Microsoft employees who made these decisions.

These all would not be the matter today, but web browsers follow the Unix convention and use / characters for web page addresses. A typical Windows user sees a forward slash when they type a web address and a back slash when they type the location of a local folder; so, this can be confusing. Websites follow the Unix convention, as do other protocols like FTP. Even if you’re running a web server or FTP server on a Windows machine, they’ll use forward slashes because that’s what the protocol calls for.

Other Operating Systems (OS) are using forward slashes for the same reason; it’s the convention of Unix. Linux is a Unix-like operating system; so, it uses the same type of slash. Mac OS X is based on BSD (Berkeley Software Design), an another Unix-like operating system. Other consumer operating systems like Android, Chrome OS, and Steam OS are based on Linux, so they use the same type of slash.

The more interesting question is, here, whether it really matters or not? Browser and OS developers seem to realize that the users are confused; so, they often go out of their way to accept any type of slash possible. 

If you type http:\\portonovocomputertech.blogspot.com\ into Google Chrome, Mozilla Firefox, or Internet Explorer, the browser will automatically correct it to http://portonovocomputertech.blogspot.com/ and load the website normally. 

If you type C:/Users/Public into Windows Explorer and press Enter, it will automatically be corrected to C:\Users\Public and you’ll be taken to the correct location.

DOS developers weren't satisfied with this in the earlier days; so, they made DOS to accept both types of characters for paths. Even you may type commands like C:/Windows/ into the Command Prompt, today, and you’ll be taken to the correct folder.

This doesn’t work everywhere in Windows, if you type a path like C:/Users/Public into the Open dialog and press Enter; you’ll see an error saying that the file name isn’t valid. Other web-based applications may show you the error if you attempt to type a path like http:\\portonovocomputertech.blogspot.com\ it depends whether the program corrects it for you or decides to display an error.


You can just forget that there are two different types of slashes, but it occasionally does matter. It would be nice if everyone used a consistent separator for directory paths, but Windows has historically been all about backward compatibility, even in the early 1980's.