Friday 19 August 2016

How to Install Android Apps on SD Card, by Default & Move Almost Any App to the SD Card

How to Install Android Apps on SD Card, by Default & Move Almost Any App to the SD Card


By default, Android Apps will be installing on the device storage of your smart phone; but the trick explained, in this article, is to set the SD card as your default installation location. This trick is allowing you to move, almost, any App to the SD card and no root access is required. And this tweak requires Android 2.2 or later.

To change the default installation location, you should have to use Android Debug Bridge (ADB) utility, a tool-kit, included in the Android Software Development Kit (SDK), which available with Google's Developer Console.

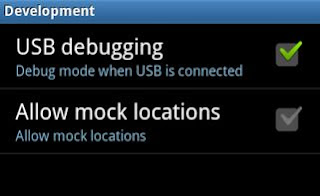
Enable USB Debugging: First, you've to enable USB debugging on your Android device. Open Settings > Applications or Developer options > USB Debugging.

Tap the USB debugging check-box to enable it. This will enable debug mode, allowing you to change the settings on your Android device from your computer. You should have to disable debug mode after completing this process.
Install the Android SDK: Now download and install Google’s Android SDK on your computer. If you don’t already have Oracle’s Java JDK installed on your computer, you’ll have to download and install it before installing the Android SDK. After you’ve installed both the JDK and Android SDK, launch the SDK Manager from your Start menu.
The ADB utility doesn't installed by default. This utility is included in the Android SDK Platform-tools package; so, select this package and click the Install button to download and install it.
When the process completes, connect your Android device to your computer with its included USB cable. Windows should locate the device and install the appropriate drivers, automatically. If it doesn’t, you may have to download and install the appropriate drivers from your Android device’s manufacturer. Do not mount the device after connecting it – just plug it in.

Using ADB: Open Windows Explorer window and navigate the folder .... android-sdk\platform-tools

On Windows, you’ll find this folder at C:\Program Files (x86)\Android\android-sdk\platform-tools, by default.

Check C:\Program Files\Android\android-sdk\platform-tools, if you’re using a 32-bit version of Windows.

Now launch a Command Prompt window in this folder by pressing and holding the Shift button, right-clicking in the folder, and selecting Open command window here.
Run the adb devices command and you should see your connected Android device.
Run the following command to set the default install location to your SD card:
If you want to revert this change later and install apps to the internal storage by default, run this command:
2 represents the external storage, whether it’s an SD card or USB storage and 0 represents your device’s internal storage, which is default.


Moving Apps to SD Card:
Apps that refused to leave your system storage can now be moved to the external storage. For instance, below you’ll see screenshots of the Slacker Radio app. Before the change was made, the Move to USB Storage button was grayed out. After the change was made, the button is enabled and the app can be moved.


To move an App to the SD card, open the Settings screen, tap Applications, and select Manage Applications. Select the App you want to move and tap the Move button on its details screen.

A Warning: 
Some Apps shouldn’t be installed to your SD card and they remain installed on the internal storage. The external storage is unavailable when your Android device is mounted on your computer, so Apps that remain running all the time should be left on your internal storage. Widgets, launchers, animated wallpapers, and anything you want to use while your Android’s SD card is mounted on your computer should be left on the internal storage.

Tuesday 16 August 2016

Understanding Basic Image File Formats- JPEG, PNG, TIFF, GIF

Understanding Basic Image File Formats

We've witnessed a wide range of file formats across our screen; but do you really understand what they mean? For instance, you may know that a JPEG is for pictures; but how about a PNG and a TIFF? And which type of format supports an image with a see-through background?
This article will explain to those questions and even more! 

JPEG is developed by 'Joint Photographic Experts Group', which supports a wide range of colors; so, it's the one most folks capturing on digital cameras and scanners. JPEG is the most common format, as well, for storing and transmitting photographic images on the World Wide Web

JPEG can be compressed to a smaller file size, which maximizing the space of camera's memory card. It also works excellent for black and white photos. Its images can be posting online and sharing via e mails. In fact, a JPEG saved at the highest quality from your scanner, which is indistinguishable from a TIFF.

JPEG is not suited to the files, which undergo multiple edits, as its quality of image will usually be lost each time when the image is decompressed and re-compressed, particularly if the image is cropped or shifted. To avoid this, an image that is being modified or may be modified in the future can be saved in a lossless format, such as TIFF, GIF, PNG, or a raw image format. The JPEG standard actually includes a lossless coding mode, so the mode is not supported in most products of JPEG.

TIFF, Tagged Image File Format, is a flexible, adaptable file format for handling images and data. Unlike JPEG files, a TIFF file using lossless compression when a image may be edited and re-saved without losing image quality. It's the gold-standard in printing with high-quality images, which is always as pristine like the original.
TIFF originally gained popularity as a scanning format and designers used to rely on TIFF. Nowadays pro-level page layout Apps can be used native Photoshop files, which has all the quality of a TIFF at a smaller file size. If you’re sending an image to someone else for inclusion in a printed book, brochure or magazine, you could send a high quality JPEG; however, to be super safe, send an uncompressed TIFF. 

PNG, Portable Network Graphics, is the most used lossless image compression format; so, you don't lose any image detail. It supports a wide range of colors and transparent backgrounds. As a result, it produces higher-quality images than JPEG format, but the file sizes are bigger. Unlike JPEG, the PNG format keeps text and logos crisp when posting online, which is handy for social media cover images. 

PNG comes in two flavors: PNG8 and PNG24. The later, PNG24, supports more colors and partially transparent pixels, which is crucial if you’ve added a drop shadow to an image with a transparent background or when the image you want to post online includes a large gradient (a smooth transition from one color to another). The other uses high quality graphics and post highly detailed images to online photography.
PNG is better for high quality full color images with a transparent background (checkerboard pattern in Photoshop denotes transparency). 

GIF, Grafic Interchange Formate, is perfect for the images of web graphics or logos. It produces small file size with limited number of colors and transparent background. It's file format is not as popular as it used for static graphics, but still widely used for animated graphics on web.
The image on the left is perfectly suited for a JPEG; but the two on the right are perfectly suited for GIFs.

PSD, Photo Shop Document, is the native format of Adobe Photo Shop and this format supports layers (enabling to image adjustments), graphic elements and text that can be stored inside a single document. Saving your file in PSD format keeps your layers intact; so, you may protect your original image and you can continue to edit the document whenever you need. Sometimes, it stands for PSB, Photo Shop Big, which extends the PSD file format to maximum height and width to 300,000 pixels and the length to around 4 Exabytes. Because of Photoshop's popularity, PSD files are widely used to extent some competing software. 


PDF, Portable Document Format, is very popular for sharing single and multi page documents to view and print. Saving a file in this format is just taking a picture of the file, which included the text, fonts, graphics, videos. So, it looks just like the original in displaying and this format can be opened and printed by most of every computer. PDF files can be compressed and it is often preferred by printing companies for stuff like invitations, business cards, brochures and etc., We can generate a high quality PDF from anything and this format is easy to sharing with others.

The BMP file format, also known as Bit Map Image file, is a popular graphics file format used to store bit map digital images especially on Windows based PC's.

While there are many more formats, but above indicated are the most common in use and hope the creative force be with you all!