Sunday 30 June 2013

Five Best Ways To Extend Smartphone's Battery

Five Best Ways To Extend Smartphone's Battery


Battery is one of the top most attention part for your phone. If you maintain it with a good care, then works better and long lasting! 


How to extend Smartphone's battery juice: 
1. Turn off the connectivity options when not in use. 3G, Bluetooth and WiFi are the main connectivity methods and they took a huge amount of battery juice on smartphones. So, turn off them - when not in use. 

2. Phone's screen lights should be reduced as much as low. A brighter display of screen is also a cause to drain the battery heavy; so, set it as low as you can. (You may get at least one hour excess of battery life, if you decreasing the screen's display;-) 

3. Deactivate, the running, background Apps. Some applications are running on background without your knowledge. So, deactivate them by going to Task Manager  and do not run any unwanted programs on your smartphone. Also uninstall the programs, which you never use. 

4. Say, 'GOODBYE' to games; because playing games on your phone is worst and losing battery juice heavily. Indeed, smartphones are made for playing games, too; but play it in a limitation. Do not use your smartphones as for gaming purpose; if you do it, then you've to face problems and have to buy another soonest. The same rules of game is apply to the video playback, too; but no restrictions for mp3 songs.  

5. Synchronizing services has to be limited on your phone. If you enabled sync services for e mails, face book, twitter or contacts will affect the battery's performance.
Some other tips to gain more life on battery....... 
1. Start the charging process when the battery is nearer 15%. 
2. Always let the battery to charge fully 100%. 
3. Use an original and company recommended charger. 
4. Avoid USB data cable to charge, USB cable won’t give the sufficient volt. 
5. Let your battery drain completely once a month. 
6. Use latest version of operating system. 
7. Install Google Apps like JuiceDefender to adjust the setting automatically. 
8. Do not install unofficial OS from third party.

Thursday 27 June 2013

Windows: 32-bit Vs 64-bit

Windows: 32-bit Vs 64-bit

When shopping a new computer or upgrading an old, everyone of us come across '64-bit' and wondered what it means!  We will look the history of 32-bit and 64-bit, as well the benefits of using a 64-bit Windows environment.


In computer architecture, the CPU’s register is a small amount of storage used by the CPU and it keeps the data to access, quickly, in order for optimum computer performances. The bit designation refers the width of the register, thus a 64-bit register can hold more data than a 32-bit. The more ample the space in the CPU’s register system the more it can handle, especially utilizing system memory. 

A CPU with a 32-bit has a ceiling of 232 addresses within the register and limited to accessing 4GB of RAM. This may have seemed like an enormous volume of RAM when they were hashing out register sizes 40 years ago; but it's an inconvenient limit for modern computers. 

The first supercomputer, utilizing a 64-bit architecture, was Cray-1, designed by Cray Research, which sets a precedent for 64-bit. Till 2000, the consumers having confusion over 64-bit, like poor driver support that severely hampered. 

In 2001 Microsoft released Windows XP, a 64-bit edition, with extremely limited driver supports. In the following years, Windows supported 64-bit in their Vista edition. Both of the 64-bit editions of XP and Vista was not widely adopted by consumers. 

The release of Windows 7, changed the things in favor to 64-bit that computing more and widely adopted.  

How to know your present system handles 64-bit? First, you've to know  on which bits (i.e., 32 or 64) your system is running and you can check your system's version of bit (here), then make sure your system handles 64-bit or not? And if your Windows 7 runs on 32-bit version then it can handle an upgrade to Windows 7, 64-bit. 
Further, testing your system's processor could even be possible to assume the system (XP, Vista or 7) that running over 32-bit has to be upgradeable to 64-bit version of Windows.  

To perform the test visit SecurAble, a free and portable application, which tests your processor that has the ability to run the 64-bit versions. It checks also the Chip that supporting D.E.P (Data Execution Prevention), a security technology designed to protects the system from “unchecked buffer” attacks. Finally, it checks system's Hardware Virtualization. The technology of “Virtual Machine” is used to create environments that can be used to operate the system from any actions taken by software running within the “virtual” environment. 

When clicking the three regions, SecurAble will display the results for each feature that will helpful to understand what's going on in your system.
According to SecurAble results, you may come across on computing 64-bit and overcoming an idea, whether your system really capable to run 64-bit or not.
Any way, there are enormous benefits, you may get, when makes a ride on a 64-bit computing system. 
  • Rock More RAM: Windows 32-bit versions are limited to 4GB of RAM while a 64-bit versions can store 264 (over 18 quintillion or 1.8×10¹⁹) different values of RAM.  Hence, a processor with 64-bit memory addresses can directly access 264 bytes (=16 exbibytes) of byte-addressable memory. Pragmatically, a 64-bit of Windows 7 - Home editions are limited (because of licensing issues, not physical limitations) to 16 GB of RAM and Professional or Ultimate editions can rock up to 192GB of RAM. 
  • Feel the increased efficiency: Due to the nature of 64-bit's address register, Windows 64-bit allocates more memory that has been chewed up from secondary components such as graphic or video cards. So, this will double the physical amount of RAM and you feel like the way of increased new efficiency in your system. 
  • Virtual Memory: Virtual memory architecture for 32-bit is limited to assigning 2GB, while 64-bit has a limitation up to 8TB, which can be used more efficient way to allocate the virtual memory for the optimized applications such as Photoshop, digital video, scientific computing, and large databases and so on.  
  • Enjoy Advanced Security Features: 64-bit Windows OS, has included the above mentioned D.E.P as well as K.P.P (Kernel Patch Protection), a patch guard that prevents the kernel exploits and device drivers infections. 
These are the wonderful sounds, i.e., advantages, for 64-bit OS.
Unfortunately, there were also some shortcomings, i.e., disadvantages, incurring you such as you can not find 64-bit OS drivers for older systems - because the hardware companies would spend their energy to support new products (and also encourage you to buy) than supporting older. 

Motherboard issues also difficult for an earlier systems that were not supporting the RAM more than 4GB but needs an upgrade.   

Software Legacy: Systems come with older legacy applications also need either virtualization or an upgrade because the older system's applications are not supporting the plugins or extensions of 64-bit version. 

So, 64-bit computing has become affordable, easy to use and practically good.

Sunday 23 June 2013

How to know your Windows System is running over 32-bit or 64-bit?

How to know your Windows System is running over 32-bit or 64-bit? 

Most of the computer users having doubt whether they're running 32-bit or 64-bit of version on their Windows system! This article will realize to make more sense to show everyone 'how to figure out themselves'.

Here's the two simple process to identify the bit(s)!

Windows XP: Without doubt, almost everyone positively running a 32-bit version. If you insist, just right click on My Computer then select Properties.

Now you'll see 'System Properties' window. If your system running on 32-bit version of Windows then the system doesn't give anything other than Microsoft Windows XP; but the system actually running a 64-bit then it reveals the message on this window.


Windows Vista or Windows 7: Open Start menu right click the Computer then select Properties.


Now you'll see 'System Information' screen. From this screen you can identify the System type, which is 32-bit OS or 64-bit OS.

Saturday 22 June 2013

Happy Speedy Browsing - Mozilla FIREFOX!

How to Do Mozilla Firefox Faster Again!
Have you experienced the SPEEDY FIREFOX browser slowing down or crashing? It's the reason of unwanted plug-ins, extensions, and the browsing data could do the browser speed slow or even crashing. 

Well! We'll discuss how to rectify the problems to speeding-up Firefox by disabling plug-ins, extensions and clearing browsing data.

Plug-in (or plugin) is a piece of software components, which adds specific abilities to an application and commonly used in web browsers to play video, audio, online games, presentations, scanning viruses, display new file types and more. 

Plug-in helps Firefox to manage internet contents such as Adobe Flash, Adobe Reader, Windows Media Player, Java, Quicktime, Silverlight etc., and perhaps, there were some other plug-ins also installed automatically and those were actually not required for our work. So, these type of (unwanted) plug-ins could make slowing the speed of Firefox and they can be rectified by disabling them.  

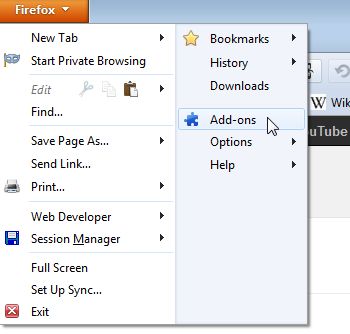
Managing plugins: Click the Firefox button and select Add-ons from the drop-down menu. (or from Menu bar > Tools > Add-ons)  
Now Add-ons Manager will open in a new tab. Click 'Plugins' from the left side of the tab. A list of installed plug-ins will be displayed. For the plugin(s) that you want to disable, click the corresponding 'Disable' button at the right.
NOTE: Plugins can only be disabled and they can not be deleted or uninstalled; but the plugin is associated with an extension, then the plugin could automatically be removed while uninstalling the extension.

After disabling, the plug-ins went gray in color and Disable button changes to Enable and it can be changed again to Disable, if required. 
Aware when disabling plug-ins such as Flash Player, QuickTime, and Java Applets etc., that were often take part in lots of web site to run the applications, videos etc.,  

As indicated earlier, plugins can not be uninstalled, manually. Most plugins, however, come with their own un-installation utilities. Visit plugins article from Firefox Help site for the information how to uninstall various common plugins. Further if you find an uninstaller program doesn't work for a particular plugin, then visit manually uninstall a plugin.
           
Extension is a programming file that serves to extend the capabilities or the data available to a basic program. It is a kind of (or list of) commands which are directly included in the program. This term often (mistakenly) coincides with plug-in. When installing software, you may be instructed to take one or more steps related to installing extensions (or these steps may automatically be done for you). 

In Firefox, extensions are doing a roll to add additional functions such as blocking advertisements, downloading videos, integrating social network sites etc., and enhancing the features of Firefox, too.

However, installing more extensions will slowing down the speed of Firefox. So, installing less (or required) extensions will keep Firefox speed normal. To speeding up Firefox, extensions should be disabled (not to be uninstalled) and later those can be enabled due to our requirements.

To disable an extension click 'Extensions' from the left side of Add-ons Manager. 
The extension is also changed to grey color when it will be disabled. And the same could also be enabled, if required. Some extensions are incompatible with the newer version of Firefox and could not be work. 

Most extensions require you to restart Firefox to be disabled. If you get a restart message, as shown in the below image, then click 'Restart now' link.


Note: Option button is not available for disabled extensions and the disabled extensions are moved to the end of the extensions list. 

If you like to remove an extension, completely, then open Add-ons Manager and search the extension that you want to remove from the list. Click the Remove button corresponding to the extension. If you get Restart message for removed extension, then click Restart now link to complete the removal process. 

Note: An extension can also be removed, when it is in disabled mode. 

Browsing Data: Firefox also keeps the tracks of sites that you've visited as files downloaded, cookies, and more. All these data were collected in the history and when the history database became larger and larger then Firefox will be slowing down or crashing. Firefox provides several methods to clear the browsing data.  

From Menu bar click History then select Clear Recent History from the drop-down menu. 

From 'Clear All History' dialog box (as pictured below), you can choose the deletion type as you wish. Select the boxes under 'Details' for the items you want to clear.
 
Note: If you choose 'Everything', a warning message will display and saying 'This action cannot be undone'.


Clear Browsing Data for a Single Website: If you like to keep browsing data for few websites, and not for others then you may choose selected data for the specific sites to clear browsing history. From Menu bar click History then select Show All History from the drop-down menu. 

The Library dialog box will display. From left pane of Library dialog box, choose the time frame (i.e.,Today, Yesterday and so on) that you visited the websites, and to clear the history. 


A list of websites, for the time you visited, will be displayed in the right pane (as shown above). Right click on the desired website in the list and select 'Forget About This Site' from the popup menu. If there will be a long list of sites, you can use 'Search History' box to find out the desired website. 

Note: Firefox doesn't provide re-confirmation message for this process while you delete the desired sites.
         

Clear Browsing Data  When Firefox Exits: To clear browsing data, automatically, when you close Firefox, from Menu bar choose Tools > Options.  

From Options dialog box, open 'Privacy' tab and select 'Use custom settings for history' under 'History' section.   

 
Now you'll be prompted for additional options as shown in the below picture.  Tick the box of 'Clear history when Firefox closes' then click 'Settings' button.  


Now 'Settings for Clearing History' dialog box will be opened; tick the boxes for the items that you want to clear when you close Firefox then click OK button. You'll be taken, again, to the 'Options' dialog box; click OK to accept your changes.

!!!HAPPY SPEEDY BROWSING!!!

Visit For CHROME: Happy Speedy Browsing - CHROME!

Tuesday 11 June 2013

WINDOWS: Hidden Tools

WINDOWS: Hidden Tools

Windows contains a variety of system utilities that were well hidden and some were buried in the Start Menu, while others could be accessed by commands.
 
Most of the tools could be launched, easily, through Start Menu, if you know their names. For Windows 8, you should have to select Settings category from the Search Screen. 

This post will share some hidden tools of Windows, which were helpful to you!

System Information: This utility reveals the information of system and displaying everything from OS Name, Version, System Name, Model, Processor and so on. To get this utility just type System Information at your Start Menu (or Start Screen). 
Resource Monitor: This application lets you view detailed real time information about hardware resources (CPU, Disk, Network and Memory) and system resources (including handles and modules). Through this tool, you can identify all the running processes; especially which process is working heavily on the system. In fact, this tool provides a statistical report of your system in which Task Manager would not doing so. Using this tool, you can start or stop services, analyze or stop running processes and so on. To launch this tool, just type Resource Monitor at your Start Menu (or Start Screen).
You can also get by opening Task Manager > Performance Tab, then select Resource Monitor.
        
Performance Monitor: This application is monitoring your system and gather performance reports. It helps you to view performance data either in real time or from a log file. To launch this application just type Performance Monitor at your Start Menu (or Start Screen).
Computer Management: Computer Management has variety of tools to manage your computer such as Task Scheduler, Event Viewer, Shared Folders, and so on. To access this tool, just type Computer Management at your Start Menu (or Start Screen).

  • Task Scheduler: allows you to view and customize the scheduled tasks of your computer. You can also create your own custom scheduled tasks.
  • Event Viewer: allows you to view and filter system events from software installation to application crashes and blue screens of death.
  • Shared Folders: displays the folders shared over the network on your computer. Its an useful interface to view what folders are being shared.
  • Device Manager: (a classic Windows Device Manager) allows you to view the devices that connected to your computer. You can disable them, and configure their drivers.
  • Disk Management: a built-in partition manager you can use without downloading any third-party tools.
  • Services: allows you to view and control the background running services in Windows.
Administrative Tools: Computer Management tool also found itself in Administrative Tools folder along with Event Viewer, Performance Monitor, Task Scheduler. To access this tool, just type Administrative Tools at your Start Menu (or Start Screen).
Group Policy Editor: It has variety of settings that were designed for system administrators  to customize and lock down PCs on their networks. It contains some settings also for average users to disable the lock screen and skip to the log-in screen directly. To launch this option, just type gpedit.msc at the Start Menu (or Start Screen) then press Enter.
Windows Professional or Ultimate editions only having Group Policy Editor option.

Registry Editor: is a hierarchical database, where Windows OS configuration settings and options are stored. The kernel, device drivers, services, profiling system performance, user interface and third party applications could make the use of registry. To access this option just type regedit at the Start menu (or Start Screen) then Enter. 

Advanced User Accounts Tool: provides some options like Manage Passwords, Advanced User Management Tasks etc., which were not available in the Standard Interface. To access this option, press WinKey+R to open Run Dialog Box and type either netplwiz or control userpasswords2 then Enter.
MSConfig: is a classic tool for System Configuration. This tool allows you to control the start-up programs on Windows and customizing your boot loader, which is an useful utility - if you've multiple versions of Windows installed. To launch this utility, just type msconfig at your Start Menu (or Start Screen) then Enter.

Windows Memory Diagnostic: is a built-in tool in Windows through which you can restart your computer and test the memory for defects. If you wish to check computer's memory for errors, just use this utility (not required a third-party tool). To activate this tool, just type windows memory diagnostic at your Start Menu (or Start Screen).

Disk Cleanup: will scan and clean-up your system for the temporary files, offline webpages, temporary internet files, memory dump files and so on. Some cleaning utilities will also do this job, and CCleaner will be prefered by advanced users. However, Windows Disk Cleanup is a default tool, which doing a good roll. To access this tool, just type disk cleanup at your Start Menu (or Start Screen).