How to Install Android Apps on SD Card, by Default & Move Almost Any App to the SD Card
By default, Android Apps will be installing on the device storage of your smart phone; but the trick explained, in this article, is to set the SD card as your default installation location. This trick is allowing you to move, almost, any App to the SD card and no root access is required. And this tweak requires Android 2.2 or later.
To change the default installation location, you should have to use Android Debug Bridge (ADB) utility, a tool-kit, included in the Android Software Development Kit (SDK), which available with Google's Developer Console.
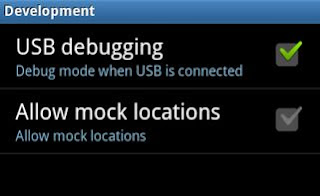
Enable USB Debugging: First, you've to enable USB debugging on your Android device. Open Settings > Applications or Developer options > USB Debugging.
Tap the USB debugging check-box to enable it. This will enable debug mode, allowing you to change the settings on your Android device from your computer. You should have to disable debug mode after completing this process.
Install the Android SDK: Now download and install Google’s Android SDK on your computer. If you don’t already have Oracle’s Java JDK installed on your computer, you’ll have to download and install it before installing the Android SDK. After you’ve installed both the JDK and Android SDK, launch the SDK Manager from your Start menu.
The ADB utility doesn't installed by default. This utility is included in the Android SDK Platform-tools package; so, select this package and click the Install button to download and install it.
When the process completes, connect your Android device to your computer with its included USB cable. Windows should locate the device and install the appropriate drivers, automatically. If it doesn’t, you may have to download and install the appropriate drivers from your Android device’s manufacturer. Do not mount the device after connecting it – just plug it in.
Using ADB: Open Windows Explorer window and navigate the folder .... android-sdk\platform-tools
On Windows, you’ll find this folder at C:\Program Files (x86)\Android\android-sdk\platform-tools, by default.
Check C:\Program Files\Android\android-sdk\platform-tools, if you’re using a 32-bit version of Windows.
Now launch a Command Prompt window in this folder by pressing and holding the Shift button, right-clicking in the folder, and selecting Open command window here.
Run the adb devices command and you should see your connected Android device.
Run the following command to set the default install location to your SD card:
If you want to revert this change later and install apps to the internal storage by default, run this command:
2 represents the external storage, whether it’s an SD card or USB storage and 0 represents your device’s internal storage, which is default.
Moving Apps to SD Card:
Apps that refused to leave your system storage can now be moved to the external storage. For instance, below you’ll see screenshots of the Slacker Radio app. Before the change was made, the Move to USB Storage button was grayed out. After the change was made, the button is enabled and the app can be moved.
To move an App to the SD card, open the Settings screen, tap Applications, and select Manage Applications. Select the App you want to move and tap the Move button on its details screen.
A Warning:
Some Apps shouldn’t be installed to your SD card and they remain installed on the internal storage. The external storage is unavailable when your Android device is mounted on your computer, so Apps that remain running all the time should be left on your internal storage. Widgets, launchers, animated wallpapers, and anything you want to use while your Android’s SD card is mounted on your computer should be left on the internal storage.


No comments:
Post a Comment