Sunday 17 September 2017

Auto Back Up Your Computer with Windows 10's Built-in Tools

Auto Back Up Your Computer with Windows 10's Built-in Tools

When your computer's hard drive fails, then you lost important presentations you're working on it. It's a worst experience that you across to lost your childhood, relatives or friends photos and important docs such as your certificates and more.


Sometimes, it's possible to recover those data; but to pay a lot of money to get them back. Note that every hard drive fails one day. According to Back blaze, a back-up service, 50% of hard drives failed after only four years. So, save yourself from the trouble and start backing-up your computer right now.


If you don't have an idea 'how to back-up your system', this article will explain 'how to build it on your system' and get your computer to back-up all the precious data on a regular schedule. Its painless in Windows 10, and easier than ever.

Windows 10 includes two different back-up programs: 

1. File History and 

2. Backup and Restore.

File History automatically saves multiple versions of a given file; so, you can go back in time, and restore a file before it was changed or deleted. This is useful for files, which changing frequently, like Word documents or Power Point presentations.

Backup and Restore creates a single backup of the latest version of your files on a schedule. It can also create a system image, which is a snap-shot of your entire system—operating system, programs, documents, and all—which makes it easy to restore everything if something terrible happens.

You could use one or the other; but using both is more comprehensive back-up strategy. These backups will be the first line of defense, if any unexpected catastrophic happens on your computer, such as hard drive failure, malware infection, or accidentally delete something. 

This, local back-up, process will be much quicker in recovering your files and, with the system image, you can get your entire computer back, almost immediately, to exactly the way it was before a system crash. 

And if you, still, need online back-ups, then Crash Plan is our choice that can be configured for remote back-ups to another computer. 

Using File History: This option has been released in Windows 8; but Windows 10 adds new interface with some important improvements, such as to choosing specific folders to back-up. By default, File History backs-up all the folders in your user account folder (C:/Users/[accountname]), which included your desktop, documents, downloads, music, pictures, and a few other folders. It will also back-up your OneDrive folders. Most importantly, File History monitors these folders for any changes, and automatically backs-up any files that have been added or modified.

Enabling File History: Click the Windows button and type: File History.
The menu takes you to: Backup settings (System settings).
Click: Backup and change Automatically back my files button to On.


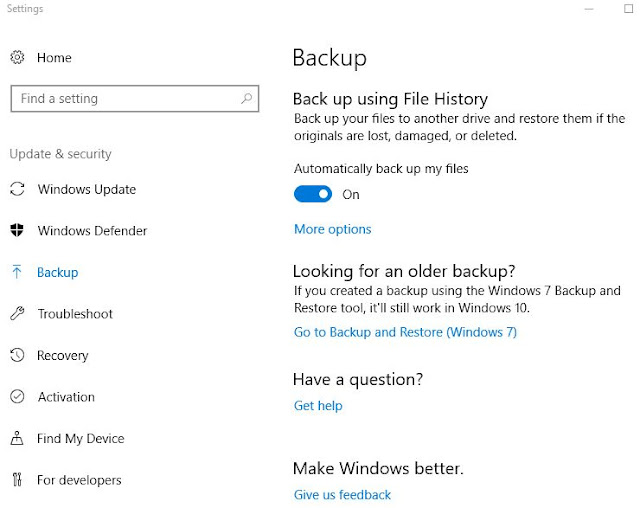
Click: Add a drive. Select the drive or network location you want to use for File History back-ups.
Click More options that takes you to: Backup options; here, you can see many options as for your need such as Back up now, Back up my files, Keep my backups, Back up these folders, Exclude these folders, Back up to a different drive and etc., 


Click the “Back up now” button to start your first File History backup. 


One option you might want to change in the settings, depending on your preferences, is how long File History’s backups to be kept: The default value is “Forever,” which means File History will keep making and saving backups until your drive is full. At this point, you’d have to either use a different drive or manually start a clean up from: Control Panel > System and Security > File History > Advanced Settings > Clean up versions .... to make space.

And if you switch to “Until space is needed,” File History will automatically remove the oldest versions of the files it backs up when space gets low on your backup drive. 

If you switch to one of the "time-frames", such as 1 month or 2 years, File History will delete the oldest versions when files reach that time setting. File History works quietly in the background and going forward.


Restore from File History Backups:

To restore your files or folders or get an older version of a file back, go to Control Panel > System and Security, click Save backup copies of your files with File History and click the “Restore personal files” link.


You may also be able to browse by backup dates and even preview files before you hit the big green button to restore the file to its previous location. 

It's also able to restoring previous versions of a file without opening the File History restore tool. Just right-click on the file and select Properties, then open Previous Versions tab.

Using Backup and Restore: This option was from the earlier versions of Windows; but in Windows 10, this feature is actually called Backup and Restore (Windows 7). Even the File History tool is turned on your system, and it's also better to use Backup and Restore option to create system image, periodically, on a different drive that helping for a quick backup and running, if something happens like boot drive failure. You may use system image to upgrade to a new drive and get back to work without re-install everything and losing your settings. 

Set up to Enable Backup and Restore: 
From Control Panel > System and Security
choose and click Backup and Restore (Windows 7)
then click Set up backup.

Now Windows will Starting Windows backup.


Select the backup drive, or alternatively, click the “Save on a network” button to choose a network to share.


Click Next button, and allow Windows to consider what have to be backup or select the folders by yourself, if you want. If you let Windows, then it will save the files on your desk-top (in your user folder and your libraries as well and creating system image).
    

The option, Let Windows choose, is the easiest solution but the other, Let me choose, is concerning about space, or to tweak which folders has to be included, and you may deselect the Libraries, because they've already been backed up on File History. And have this tool only create system images on the drive. 

Click “Save settings and run backup” button to run your first backup.
   

After your first backup, this will be done, automatically, on a scheduling time (i.e., Every Sunday at 7:00 PM) by default. 


The explained both tools are not the most robust backup and recovery tools, but they are simple, free, and built into Windows. And to supplement them, there're some online backup services available like: Crash Plan or Back Blaze.

Monday 17 April 2017

Windows 7, 8, or 10: Quick Ways to Speed Up Your Slow PC

Windows 7, 8, or 10: Quick Ways to Speed Up Your Slow PC

If your PC gradually goes slower or it suddenly making a halt for few minutes then there could be few reasons for that slowness! As of all PC issues, just re-boot your computer if something is not working properly. This can fix a few problems and faster than attempting troubleshoot by manually to fix the problem yourself.


Clean Your PC: If you want to clean-up your PC, CleanMyPC is a best tool to get the job done easily and it can even keep your computer clean automatically. It also includes great tools like ‘uninstaller’ to get rid of Apps and to clean-up the junks with the click of a single button.


Check Your PC’s Resource – Hungry Programs: If your PC is running slow or suddenly going slower then assume that there’re something is using-up those resources where a runaway process might be using more of your CPU resources, like 99%. Or, an App might be experiencing a memory leak, which using a huge amount of memory, causing your PC to swap to disk. Alternately, an App might also be using the disk a lot that causing other Apps to slow down when they need to load data from or save it to disk.

You can find out these resources from Task Manager. Just right-click your taskbar and select the “Task Manager” option or press Ctrl+Shift+Escape to open it.

On Windows 8, 8.1, and 10, the new Task Manager provides an upgraded interface with color-codes applications using a lot of resources. Click the “CPU,” “Memory,” and “Disk” headers to sort the list by the applications using the most resources. If any application is using too much of resources, you can close it normally and if you can’t, select it and click “End Task” to force it to close.

Close System Tray Programs: Many Apps tend to run in the system tray, or notification area. These applications often launch at startup and stay running in the background but remain hidden behind the up-arrow icon at the bottom-right corner of your screen. Click the up-arrow icon near the system tray, right-click any applications you don’t need running in the background, and close them to free up resources.

Disable Startup Programs: It’s better to prevent those Apps from launching at startup to save memory and CPU cycles, as well as to speed up the login progress. On Windows 8, 8.1, and 10, there’s now a startup manager in the Task Manager you can use to manage your startup programs. Right-click the taskbar and select “Task Manager” or press Ctrl+Shift+Escape to launch it. Click over to the Startup tab and disable startup applications you don’t need. Windows will helpfully tell you which applications slow down your startup process the most.

Reduce Animations: Usually, Windows uses a few animations, and those animations can make your PC a bit slower. For example, Windows can minimize and maximize windows instantly if you disable the associated animations.

To disable animations, press Windows Key + X or right-click the Start button and select “System.” Click “Advanced System Settings” on the left and click the “Settings” button under Performance. Choose “Adjust for best performance” under Visual Effects to disable all the animations, or select “Custom” and disable the individual animations you don’t want to see. For example, uncheck “Animate windows when minimizing and maximizing” to disable minimize and maximize animations.

Lighten Web Browser: If you use your web browser a lot, then your browser may just be little slow – because of browser’s few extensions, or add-ons as possible to slow down your web browser’s experiences and cause it to use more memory. So, go into your web browser’s Extensions or Add-ons manager and remove add-ons that you don’t need. You should also consider enabling click-to-play plug-ins. Preventing Flash and other content from loading will prevent unimportant Flash content from using CPU time.

Scan for Malware and Adware: Some malicious software may also slowing down your system that running in the background. And it may not be a malware, but a software, which interfering into your web browsing to track it and add additional advertisements. So, for an extra safe, we recommend you to scan your computer with an antivirus program like Malware Bytes, which catches a lot of “Potentially Unwanted Programs” (PUP) that most antivirus programs tend to ignore. These programs try to sneak onto your computer when you install other software, and you almost certainly don’t want them.
     
Free-Up Disk Space: If the hard drive is almost full, then your computer may run slower. So, you want to leave your computer some space to work on your hard drive. You don’t need any third-party software — just run the Disk Cleanup tool included in Windows can help quite a bit.

To get the disk cleanup option: Right click Start button, choose Disk Management then choose Action > All Tasks > Properties > General > Disk Cleanup > OK.

    
Defragment Hard Disk: Defragmentation is not a major issue most of the time and it's not necessary for modern versions of Windows as the modern versions automatically defragment the hard drives in the background. Solid-state drives really need traditional defragmentation, although modern versions of Windows will “optimize” them — and that’s enough.

If you have a mechanical hard drive with lots of file, like huge files of  PC game, on it and those files have to be defragmented – because Windows doesn't defragmenting them. In this situation, it is better to open disk defragmenter tool and perform a scan.

To defragment hard disk Right click Start button, choose Disk Management then choose Action > All Tasks > Properties > General > Tools > Optimize.
  

Uninstall Programs You Don’t Use: It’s better to uninstall the programs that you don’t use, and those occupying plenty of room on your system. This helps to speed-up the PC, as those programs may include auto-start, background process, and some other critical things can slowing your PC. This will also save space on your hard drive and improve system’s security. Open Control Panel, find the list of installed programs then uninstall you don’t use. 

Reset the PC / Reinstall Windows: If the above said tips didn’t fix your Windows problem then a timeless solution is to re-boot your PC by getting a fresh Windows installation! Windows modern version, such as 8, 8.1 & 10, is easier to get a fresh Windows installation and you can simply use the feature “Reset your PC”, which is built-in Windows to get a new and fresh Windows system. This process is similar to re-installing Windows and will wipe the installed programs and system settings on your PC while keeping your files.

If the PC that you’re using, still, is a mechanical hard drive then upgrade it to a Solid-State-Drive (SSD) or make sure your next PC to be SSD, which will offer a dramatic performance of improvements as most people need faster CPU with graphic processors that offer single biggest boost to complete system.

Wednesday 15 March 2017

14 Best Computer Tricks


14 Best Computer Tricks


If there's one thing that comes up with clever tricks, especially on computers, and those can be for PCs, Macs, web browsers or specific sites like You Tube, programs like Excel and etc., And what they all had in common was that using them makes your computer life a whole lot easier and more fun.


We looked through some (14) tricks and ranked the best, which are the mixture of useful and mischievous. Here they are:

1.       Get back the tab, you accidently closed:
If you want to get back a tab you closed, just press "Control" (or "Command" on Mac), plus "Shift," plus "T," and it will be magically re-appeared.

2.       Only screenshot the part of the screen that you want:
If you only need to screenshot part of the screen, there's a simple way to do it for both Windows and Macs.
For Windows: Just go to "Start" and then "Snipping Tool."
For Mac: "Command," plus "Shift," plus "4" brings up the tool. Then you just drag the area you want.

3.       Easily repeat your last command in Excel:
If you press F4 button in Excel, it repeats the last command.
Example:  "If you select a cell and highlight it yellow, you can then highlight any other selected cell(s) yellow by pressing F4."

4.       Open a link in a new browser tab with one click:
If you click the "middle" button on your mouse, you will open the link in a new browser tab. And if you middle-click an open tab, it will close it.

5.       Make a copy of a file by just dragging it:
All you have to do to make a copy of a file on a Mac is hold the "Alt" key ("Control" if you are using a PC) and then click and drag the file. This will make a copy that you can drop anywhere you want by un-clicking.

6.       Reverse search an image in Chrome:
In Google Chrome, if you press "S" while you right click on an image it will do a reverse Google search. That means you'll be able to see where that photo is and where it potentially originated. 

7.       Pause YouTube with one click, or skip backward and forward 10 seconds:
Most people know you can hit the space bar to pause a YouTube video, but sometimes this causes it to scroll down the page if you haven't already clicked on the video. If you press "K," this will play (or pause) the video every time.
Hitting the "J" key will cause you to go backward 10 seconds, while hitting the "L" key will make you go forward 10 seconds. 

8.       Move your window to any side of the screen, or to the next monitor:
If you click the "Windows" key, plus one of the arrows (right, left, up, down), your current window will move to that side of the screen. 
Similarly, "Windows," plus "Shift," plus one of the arrows will move your window into whatever monitor is that way (right, for example).
Unfortunately, this only works for Windows machines.

9.       Clear the cache in seconds:
Quickly clear your cache by pressing "Control," plus "Shift," plus "R." This will also refresh your page.

10.   Lock your computer in seconds:
On a Windows machine, hit "Windows," plus  "L" to lock your computer. This can be fun for pranks.
On a Mac click "Command," plus "Option," plus "Eject." (Or "Power" if your computer doesn't have an optical drive.)

11.   Freak people out by rotating their screen:
If you press "Control" plus "Alt" plus one of the arrow keys, it will rotate your screen that way. Note: this doesn't work for all computers (and only on Windows), but when it does, it can seriously freak someone out.

12.   Turn your browser window into a simple text editor:
If you want to bring up a basic text editor you can type in, just paste this into the address bar in your browser:
data:text/html, <title>Text Editor</title><body contenteditable style="font-size:2rem;font-family:georgia;line-height:1.4;max-width:60rem;margin:0 auto;padding:4rem;">

13.   Edit what you Chrome browser looks like:
If you want to play a trick on someone, and send them a fake screenshot of something that never existed, there's an easy way in Chrome. 
First you bring up the console by pressing "F12."
Then you enter: document.designMode = "on"
After this, you can edit any of the text that appears on the screen.

14.   Reset your browser so it's not zoomed in:
Here are three ways to deal with zooming in your web browser:
"Control" (or "Command" on Mac) plus "+" zooms in
"Control" (or "Command" on Mac) plus "-" zooms out
"Control" (or "Command" on Mac) plus "0" resets it to default