Friday, 25 December 2015

An Introduction: Windows10 & Microsoft EDGE

An Introduction: Windows10 & Microsoft EDGE

Microsoft Edge, a new web browser, is introduced by Microsoft on its Windows-10 OS as a replacement to Internet Explorer. Edge's interface has been rewritten with the old interface of Internet Explorer with all of its clutters. Microsoft claims Edge is designed to be a lightweight web browser with a layout engine built around web standards. Microsoft continues its effort in adding more features to its new browser and expecting Edge will be more competitive with Chrome and Firefox.

Edge includes a software integration Cortana, an intelligent personal assistant, which only be worked after enabling system wide. To do system wide, click Cortana search bar from Windows Task-bar then provide your name to setting up Cortana. You may also check, if this feature is enabled, by click (or tap) More actions button in Edge, then Select > View advanced settings and ensure Have Cortana assist me in Microsoft Edge option is enabled.
  
Cortana's features include being able to set reminders, recognize natural voice without the user having to input a predefined series of commands, and answer questions using information from Bing (like current weather or traffic conditions, sports scores, and biographies). To use Cortana, just type a question into the location bar at the top of the Edge window or on the New tab page. 
For example, you could type “weather in [city]”, “how old is [famous person]” or “when is [holiday] [year]”. Cortana offers quick answers to your questions. 

An integrated sharing option is included on Edge browser, with a Share button on its toolbar. Tap Share button, which opens the system Share panel. You can extend the list here and share to more services by installing the appropriate Apps from the Windows Store.  

For example, if you want to share on Facebook, install the Facebook App. If you want to share on Twitter, install the Twitter App. This provides you with an easy way of sharing web pages without any browser extensions, just like you would do on Android or Apple’s iOS.
You can also tap the title of the page in the Share panel and choose to share a screenshot of the current web page rather than a link to it.
  
Edge includes a reading view functionality that strips the clutter from articles you find on the web and makes them more easily readable. To activate this function, just find an article on the web and click or tap the reading view icon, which looks like a open book, in the address bar. 

Edge includes a reading list feature, too, which allows to save the articles you want to read later, without cluttering your favorites list. To do, just click or tap the star icon on the address bar then select Reading list heading then add the page to your reading list.
To Access your reading list, just click or tap Hub button and select Reading List category. There you will see the pages you saved to read later, that stored separately from your normal favorite web pages.

Edge includes web page annotation, a part of tools, to marking-up a web page to drawing on, highlighting, erasing, add notes and copy individual parts of a web page. Tap Make a Web Note button, the one between Hub and Share buttons on the toolbar, to start marking-up a web page.   
The Save button allows you to save the note to Microsoft OneNote, your favorites or your reading list. You can also use Share button to share your marked up note. 

Edge still has many more features that you'd expect to find in modern browsers. They are easy to find and much of the clutter from Internet Explorer.
  • Private Browsing: Click More actions from the toolbar and select New InPrivate window to open a private-browsing mode window. In this mode, your browser history data won’t be saved.
  • Pin to Start: Edge allows you to open the menu and select Pin to Start to pin the current web page to the Start menu or Start screen as a tile, allowing you to open it quickly. Click or tap the tile will open the web page in Edge, not its own browser window.


  • Open with Internet Explorer: If you do need to open a web page with Internet Explorer, you can just tap More actions button and select Open with Internet Explorer. Internet Explorer is also hidden in the All Apps menu under the “Windows Accessories” folder. For example, you may need to do this if you need to use a legacy web app that requires a browser plug-in like Java or Silverlight.
  • Themes: Like many other modern browsers, Edge include light and dark themes and its default theme is light. To change it, open More actions and select Settings then Choose a theme as Dark.


  • Disable Flash: Edge includes an integrated Flash Player, just as Google Chrome does. This is the only browser plug-in that works in Microsoft Edge. For security reasons, you can disable it by opening More actions > Settings > Advanced settings (View advanced settings), then slide Use Adobe Flash Player to Off.
  • Search Engine: Edge uses Bing as it's default search engine. But it can be changed to any other search engine, if you want, as Edge supports OpenSearch technology. To change Edge's default search engine: Enter the search engine’s website then browse to it. Now go More actions > Settings and then scroll down to select View advanced settings. In the list under Search in the address bar with, choose Add new. Select the website and then select Add as default.


    Edge's interface can also be customized in a variety of other ways through its Setting menu. For example, you can enable a Home button to quickly take you back to your preferred home page. You could activate the “Show the favorites bar” setting to get an always-present toolbar for easier access to your favorite web pages.  

    You can also configure which web pages Edge opens when you launch it, and what exactly appears when you open a New tab page. For example, you can make the New tab page largely blank without the “suggested content.”

    Wednesday, 9 December 2015

    How To Unsubscribe The Irritating e-Mails Of Newsletters - The Correct Way

    How To Unsubscribe The Irritating e-Mails Of Newsletters - The Correct Way

    Are you receiving lot of news-letters and various promotional e-mails? These e-mails are not technically spam; but they are from legitimate organizations and every legitimate company offers a consistent way to unsubscribe of their newsletters. The next time, you want to stop receiving e-mails from a legitimate organization, do not just click the 'Spam' or 'Trash', instead 'Unsubscribe' from those e-mails to keep your in-box clean. 

    Every legitimate e-mail will have a visible unsubscribe mechanism, and this is generally a link at the bottom of the e-mail. Just scroll down to the bottom and look for the 'Unsubscribe' link. The link often in fairly small text; so, you couldn't notice it; but it should always be there! 

    To speed things up, you can press Ctrl+F to bring up the search feature in your browser then type 'unsubscribe' to search for it. Click the link to unsubscribe for future communications from that website or business. It's really a simple way and there's almost always an Unsubscribe link! 

    The transactional e-mails, such as receipts of bank's online transaction or a receipt for a product you purchased online, doesn't has an unsubscribe link.          
    If you're in US, there's an act CAN-SPAM was signed into law in 2003 by President George W. Bush. According to this law, Federal Trade Commission (FTC) enforces compliance with some basic principles for commercial e-mails. Here are a few things the law requires:
    • All emails must contain a visible unsubscribe mechanism — this is most often a link, but can be an email address you have to send a request to.
    • The unsubscribe link can take you to a page where you can choose the types of emails you want to receive, but they can’t require you to visit more than one page to unsubscribe.
    • The unsubscribe process can’t charge a fee or ask for any personal information beyond your email address when you opt out.
    • Your request to opt out must be honored within 10 business days.
    • The email must contain a legitimate physical mailing address associated with the sender.
    • The “From” field must be accurate, and the “Subject” must be relevant and not deceptive.
    The FTC website has more info about this. While this law is in US and other countries have the similar laws, too. 

    For example, Canada’s CASL, anti-spam law also mandates an unsubscribe link in each commercial email. Europe has the similar EU DataProtectionDirective

    This is not one of those laws, which is just only on the books and never used. The FTC has enforced the law in 2006, where the Kodak Imaging Network was fined $32,000 for failing to include an unsubscribe mechanism and their physical address in an e-mail campaign they sent out. 

    So, if a legitimate business,  send e-mails and fails to include a way for you to opt out of e-mails, you may actually report them to FTC. This is why you'll usually find such unsubscribe links!  

    So, the CAN-SPAM Act helping to clean-up commercial emails sent by legitimate companies. But the real spammers are standing outside to reach of these laws and you may, even, report a serious scammer to FTC for not including the required unsubscribe mechanism; but they're probably sending e-mails from outside of US or other countries with similar laws and this would be hard to find these people - because the spam e-mails are probably coming through a Botnet of compromised computers instead of a legitimate e-mail server.  

    Fortunately, modern email services such as G-mail and Outlook.com have made great strides against these types of nasty spam, and they wouldn’t reach your in-box very often. If it does, just click the Spam button. But the Spam button should just be used for real spam and unsubscribe the legitimate commercial emails that you received with their included Unsubscribe links. 

    And note: just marking an e-mail as spam won’t actually unsubscribe you from the mailing list.

    Wednesday, 21 October 2015

    WhatsApp: Tips and Tricks


    WhatsApp: Tips and Tricks

    WhatsApp Messenger is a cross-platform mobile messaging App, which allows you to exchange messages without having to pay for SMS.

    WhatsApp Messenger uses the same internet data plan that you use for email and web browsing; there is no cost to message and stay in touch with your friends. 

    In addition WhatsApp users can create groups, send each other unlimited images, video and audio media messages.

    Everyone of us became crazy on using WhatsApp, which has over a billion downloads on Google Play alone.

    This App has made itself indispensable by adding a browser version and voice calling on its platform.

    Here we've lined-up some interesting tricks and tweaks to the people, who have deal with this App on a daily basis, which will improve their user-experiences.

    1. Mute Group Chats and Notifications: 
    Group Chats are good but most of the time they're noisy and irritating, when you're on a task at hand; so, they're best to be turned off for a specified period.
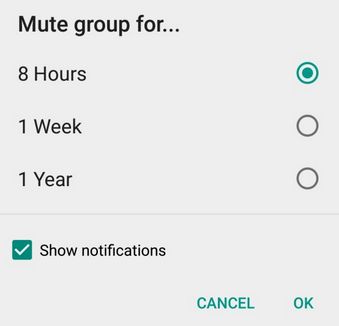
    On Android: Tap Menu > Mute. Choose the time-frame, as you like, to be muted. You can also disable notifications for a specified period. These feature is available, now, on web browser, too.

    On iPhone: Open Group Chat, tap the group subject to reveal the Group Info screen, and tap Mute. Now, choose how long the notifications to be muted.

    2. Find out who has read your message and in a group chat as well:
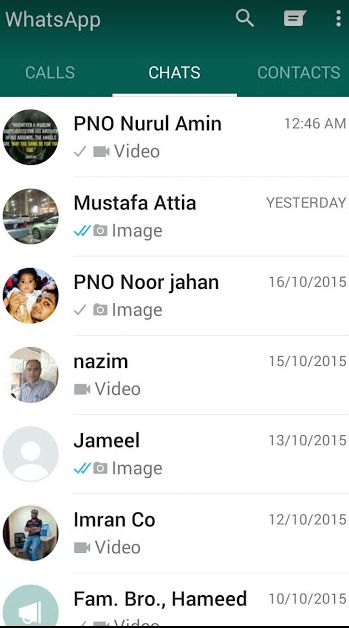
    For the messages, the app always showing one tick mark when you sent a message, which changed to two gray ticks, assume it was delivered. If the app shows two blue ticks when the recipient has read your message.
     

    Read receipts, notified by those blue ticks can seem too obsessive and creepy. So, you can disable them, too; but that also means you won't be able to see read receipts from other people.

    In a group chat:
    On Android: Do a long press on a message sent by you. This reveals an 'i' with a circle around it at the top of the screen. Tapping on it and will show you who the messages were delivered to, and read by.

    On iPhone: See the Message Info screen by opening a chat with a contact or a group, then swipe your message from the left to right to view delivery and read notifications.


    3. Disable media to save cellular bandwidth:
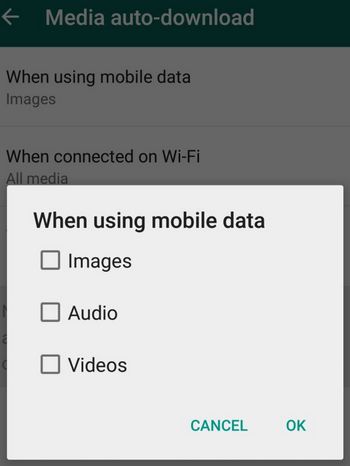
    WhatsApp lets you specify what you would like downloaded over mobile data and when connected over Wi-Fi.
    On Android: Menu > Settings > Chats and calls, then choose Media auto-download and specify when you want images, audio and videos to be downloaded on your phone.


    On iPhone: Go to Settings > Chat Settings > Media Auto-Download.

    4. Web interface:
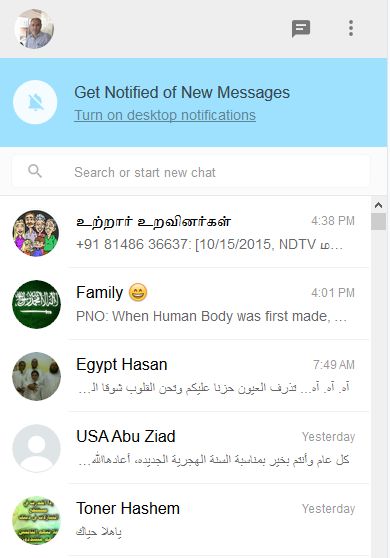
    On Android: This feature has been added recently that allows you to carry on and continue conversations from a web browser on your desk-top, which is great for those times when you’re seated and working. This feature also works with groups, if you are an admin of.
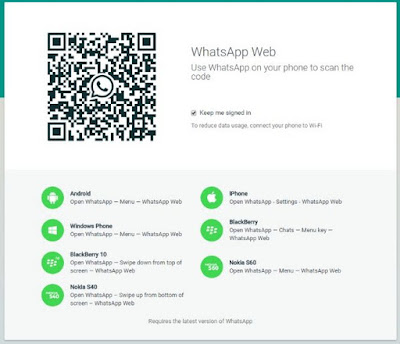
    From desk-top, go to https://web.whatsapp.com/. Open WhatsApp on your phone then tap Menu > WhatsApp Web, and tap the + sign, at the top-right side of phone screen, to scan the code, which has been revealed on desk-top.
     

    WhatsApp Web interface connects to your phone and sync messages over desk-top browser; you may, now, disconnect Wi-Fi connection, on phone, to reduce the data usage. Now enjoy WhatsApp on your desk-top to view all the messages of yours and your contacts.


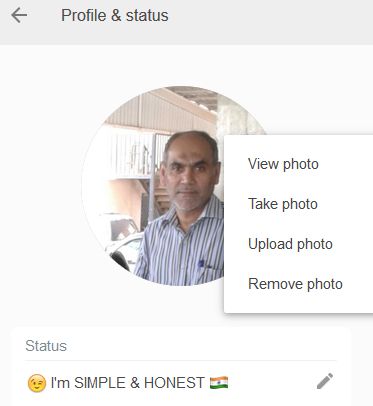
    Moreover, you can change your Profile & status by View photo, Take photo, Upload photo, Remove photo, and change your Status.


    On iPhone: Android users have been able to enjoy WhatsApp’s Web interface, but iOS users have been left longing for the feature. Thankfully, there is a way to enable the WhatsApp Web feature directly from your iPhone, but you’ll need to be jailbroken to do so. It’s called WhatsApp Web Enabler, and you can access the tutorial from the link: WhatsApp Web Enabler For iPhone 

    5. Hide personal info such as Last seen, Profile photo and Status:
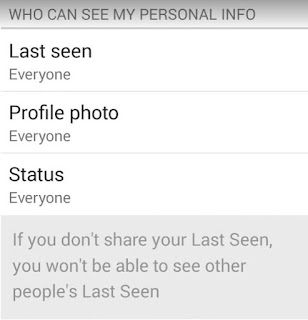
    By default, WhatsApp allows everyone to know the last time you used the App. Your Last seen, Profile photo and Status can be toggled between 'Everyone', 'My contacts', and 'Nobody' from Menu > Settings > Account > Privacy on both Android and iPhone.
     

    6. Broadcast message:
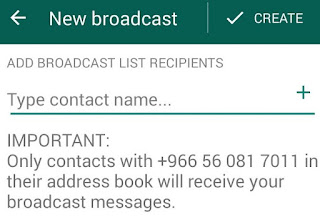
    This feature allows you to send messages to your all (or chosen) contacts, like grouping. But it works like Bcc, i.e., Blind carbon copy, where the recipient(s) doesn't realized that you've forwarded the same to others. The replies from your broadcast list will be visible only to you. It's better than a grouping SMS.
    On Android: Tap Menu > New Broadcast then select the contacts by tapping the + sign, you'd like to round up for the message.


    On iPhone: Tap Broadcast Lists button at the top of the Chats screen, tap New List at the bottom of the screen, filter from your contact list and then tap Create.

    7. Migrate to a new number:
    If you want to change your phone number, then you've to migrate your account info, groups and settings. Keep in mind that your old number will be deleted and before proceeding, confirm that you are able to receive SMS or calls at your new number.
    On Android:
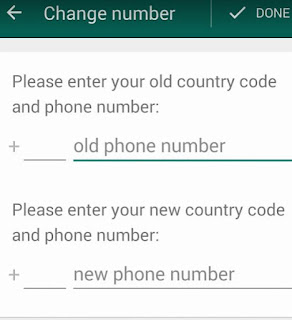
    Tap Menu > Settings > Account > Change Number. Enter the old phone number in the first box, followed by the new phone number in the second one and tap DONE.

    On iPhone:
    Go to Settings > Account > Change Number. Enter your old SIM number in the first box, and your new SIM number in the second box. 

    8. Voice Messages:
    If you're busy on your job or lazy to type, then you may use this option instead of typing and send voice messages to your contacts.
    On Android: Choose the contact to whom you'd like to send voice message then press and hold the Mic button and speak; release your finger, the voice message will be sent to the contact.


    On iPhone: Just press the Mic button to activate iOS dictation feature.


    9. Send location and explore hot-spots around you:
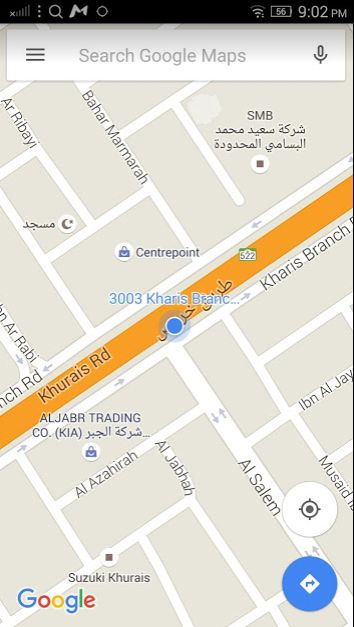
    You can send your location as a map to your contact, which mash-ups of showing your location and the check-ins of places around you from local tech to restaurants, metro, bus terminals, shopping malls and etc.,


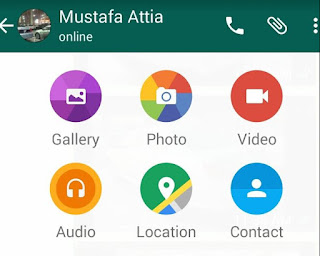
    Choose the contact to whom you'd like to send location then tap Location from the attachment pane and explore interesting hot-spots around you.

     
    10. WhatsApp Calling:
    This lets you call your friends and family for free; even if they’re in another country. WhatsApp Calling uses your phone’s Internet connection rather than your cellular plan’s voice minutes. Data charges may apply.
    On Android: To make a call, simply open the chat with the person you want to call and tap on the phone button on top.


    When any of your contact calls you, you will be notified by an incoming WhatsApp call screen. You can tap and slide the green button to answer the call, or slide the red button to decline the call. Alternatively, you can tap on the message icon on the call screen to decline the call with a quick message.
     On iPhone:
    To place a call is just as Android. But when you receive a call, and Whatsapp is closed; any call notification that you may receive will depend on your notification settings: iPhone Settings > Notifications > WhatsApp.
    • Alerts: You will see a WhatsApp Calling popup. You can Accept the call or Close to ignore the alert.
    • Banner: A call notification banner will appear at the top of the screen. You can tap the banner to answer the call or if you wish to decline the call, take no action. For more options, you can open WhatsApp by tapping on the WhatsApp icon while the banner is displayed. When you open WhatsApp, you will see a WhatsApp call screen. You can Accept or Decline the call. You may also tap on Message to decline the call and send a quick message or Remind Me to decline the call and set up a reminder for yourself.
    • None: You will not receive a notification for incoming calls. You will only be able to answer calls when WhatsApp is open.
    When you are in WhatsApp, regardless of your notification settings, you will always see a WhatsApp call screen. You will then have the option to accept, decline, decline with a quick message, or decline and set reminder.

    Wednesday, 26 August 2015

    A Glance To Use The Status Bar In Word

    A Glance To Use The Status Bar In Word

    In this article, we're explaining you the options of Status Bar and how to customize it to best suit the way you work and improve your productivity.

    The Status Bar, for MS Word, is available at the bottom of the word document window, which displays the information of your document, such as what page you are currently viewing, how many words are in your document, whether any proofing errors were found and etc.,
     

    The Status Bar can be easily customized by adding more information to or removing information from it.

    To do this, right-click anywhere on the Status Bar. Items that have check marks next to them display on the Status Bar. These items may not display at all times, depending on the current circumstances. For instance, if you’re not sharing the document with other authors, “Number of Authors Editing” will not display on the Status Bar even if you have selected it in the “Customize Status Bar” popup menu.

    Additional information, regarding different parts, of your document displays in the Status Bar. For instance, when hover your mouse over a hyperlink ...... 
    ....... the URL to the hyperlink will be displayed in the Status Bar.

    Further, if you copy and paste the content from a webpage onto a Word document, then you hover your mouse over that pasted image, the URL for that image will also be displayed in the Status Bar.
    NOTE: You can press “Ctrl” and click on a hyperlink to open the link in a browser window and also avoid automatically creating hyperlinks.

    The icons on right side of the Status Bar provide information such as Print Layout, Full Screen Reading, Web Layout, Outline or Draft and the Zoom Level as they allow you to change, how you are using Word. 

    Friday, 21 August 2015

    Windows: How To Get & Use Special Characters

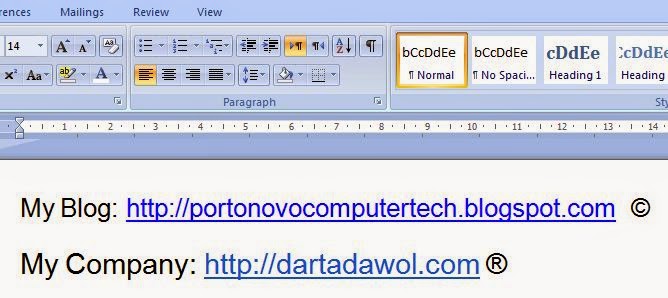
    (215) Windows: How To Get & Use Special Characters

    Many special characters (those not on the standard computer keyboard) are useful, and sometimes necessary to our work. This article describes few methods to get and entering such characters.

    The character map in Windows is a feature that can help us to insert the required special characters to our work. 
     
    To access the Character Map in Vista or Windows 7, just click on START and type character map into the search box then press Enter.

    Choose the font, which matches to your work, then choose the special character you want to use.
    Now, just paste the character into your form, or whatever application you likely to use.
     

    An another way to navigate the same through Start Menu. 
    Start > All Programs > Accessories > System Tools > Character Map.

    Here's a quick way to pull it up is just type charmap or charmap.exe into the Run box. This feature may help to those new to Windows or perhaps some users, who have forgotten it. 

    Thursday, 14 May 2015

    How To Troubleshoot Mozilla Firefox Crashes

    (218) How To Troubleshoot Mozilla Firefox Crashes   

    Web browsers are designed with complicated pieces of software, which interacting with lots of other software on your system, such as extensions, themes, plug-ins, security programs, graphics drivers, and much more. Incompatibilities or out-of-date software may often cause crashes.  
    Firefox may also crash for a variety of reasons, and you can quickly fix most crashes with it’s Safe Mode and Troubleshoot info page. However, these tricks wouldn’t fix every crash. 

    The Safe Mode will load Firefox without loading the Add-ons. To activate Safe Mode, click on Help then choose Restart with Add-ons Disabled. You may also activate Safe Mode by holding Shift key while starting Firefox.  
    Try Safe Mode for a while, if Firefox is crashing. If Safe Mode works properly, then assume the problem is with one of your Add-ons. So, you may have to leave Safe Mode then disable Add-ons one-by-one until you identify the Add-on, which causing the problem. But do not waste your time by going, one-by-one, through the steps to identify the exact cause; instead, go to technical information page then solve the problems.

    Firefox creates a technical information page to the user, where it stores the technical data, which is useful to solve problems. All the tech info will be revealed in this page. To get the technical information page, Menu > Help (then click) Troubleshooting Information.

    From Troubleshooting Information page, you can reset Firefox browser by click the button Refresh Firefox. This will remove your Add-ons and customization then restore browser settings to its default. 

    Now Firefox will create a new troubleshooting info page and migrating your old info such as bookmarks, browsing history, cookies, auto-fill info and saved passwords. But you will lose your extensions, themes, site-specific preferences and search engines, when you refresh Firefox. 

    In particular, Firefox extensions and themes could cause crashes; so, get rid of them. 

    If Firefox crashes, again, after re-install your favorite extensions, then there might be one of your extension is likely causing the crashes. Try re-installing extensions one-by-one and identify the particular extension, which causing problem, and remove it. 

    Firefox has hardware acceleration feature, which take care of your computer's graphics card to render text and objects on web pages. It speeds-up web page rendering and manages some load off CPU. So, hardware acceleration may also cause problems with graphic drivers and graphic cards. Try to disable this feature, for a time being, if you face crashing.  

    To disable hardware acceleration Tools > (click) Options > (choose) Advanced (tab) > General (tab, then remove the tick mark from) Use hardware acceleration when available > (then press) OK.

    If Firefox works normally, without crashing, then assume hardware acceleration was likely the problem. Try to update graphic drivers and they may fix the problems. Note that you should not disable hardware acceleration, if everything works properly, as this is a useful feature. 

    Malware may also cause Firefox to crash, as malware can cause other programs to crash on your system. If you face regular crashing, then scan your computer with an antivirus program that you already have on your system or download from Microsoft Security Essentials

    Mozilla recommends to update your system's software, if Firefox is crashing. Below list of everything should have to be updated:
    1. Firefox browser has to be updated in a frequent manner. To make update: Help > (click) About Firefox. Download available updates and install.
    2. Plug-ins: Visit the Firefox plug-in update check page, where the page will scan the browser for outdated Plug-ins. Follow the links to download and install updates for any outdated plugins.


    3. Extensions and Themes: Tools > (click) Add-ons (and select) Extensions. (Click) Gear (box, and select) Check for Updates. Install any updated Add-ons.
    4. Windows: Use Windows Update to ensure Windows is up-to-date. 
    5. Graphics Drivers: Install updated graphics drivers to fix problems with hardware acceleration. 
    6. Internet Security Software: Install the latest versions of any firewalls, antivirus programs, Internet security suites, and other security applications installed on your system. 

    System's hardware problems may also cause Firefox and other software to crash. Try checking your computer’s RAM for errors if crashes continue to occur.