Saturday, 22 June 2013

Happy Speedy Browsing - Mozilla FIREFOX!

How to Do Mozilla Firefox Faster Again!
Have you experienced the SPEEDY FIREFOX browser slowing down or crashing? It's the reason of unwanted plug-ins, extensions, and the browsing data could do the browser speed slow or even crashing. 

Well! We'll discuss how to rectify the problems to speeding-up Firefox by disabling plug-ins, extensions and clearing browsing data.

Plug-in (or plugin) is a piece of software components, which adds specific abilities to an application and commonly used in web browsers to play video, audio, online games, presentations, scanning viruses, display new file types and more. 

Plug-in helps Firefox to manage internet contents such as Adobe Flash, Adobe Reader, Windows Media Player, Java, Quicktime, Silverlight etc., and perhaps, there were some other plug-ins also installed automatically and those were actually not required for our work. So, these type of (unwanted) plug-ins could make slowing the speed of Firefox and they can be rectified by disabling them.  

Managing plugins: Click the Firefox button and select Add-ons from the drop-down menu. (or from Menu bar > Tools > Add-ons)  
Now Add-ons Manager will open in a new tab. Click 'Plugins' from the left side of the tab. A list of installed plug-ins will be displayed. For the plugin(s) that you want to disable, click the corresponding 'Disable' button at the right.
NOTE: Plugins can only be disabled and they can not be deleted or uninstalled; but the plugin is associated with an extension, then the plugin could automatically be removed while uninstalling the extension.

After disabling, the plug-ins went gray in color and Disable button changes to Enable and it can be changed again to Disable, if required. 
Aware when disabling plug-ins such as Flash Player, QuickTime, and Java Applets etc., that were often take part in lots of web site to run the applications, videos etc.,  

As indicated earlier, plugins can not be uninstalled, manually. Most plugins, however, come with their own un-installation utilities. Visit plugins article from Firefox Help site for the information how to uninstall various common plugins. Further if you find an uninstaller program doesn't work for a particular plugin, then visit manually uninstall a plugin.
           
Extension is a programming file that serves to extend the capabilities or the data available to a basic program. It is a kind of (or list of) commands which are directly included in the program. This term often (mistakenly) coincides with plug-in. When installing software, you may be instructed to take one or more steps related to installing extensions (or these steps may automatically be done for you). 

In Firefox, extensions are doing a roll to add additional functions such as blocking advertisements, downloading videos, integrating social network sites etc., and enhancing the features of Firefox, too.

However, installing more extensions will slowing down the speed of Firefox. So, installing less (or required) extensions will keep Firefox speed normal. To speeding up Firefox, extensions should be disabled (not to be uninstalled) and later those can be enabled due to our requirements.

To disable an extension click 'Extensions' from the left side of Add-ons Manager. 
The extension is also changed to grey color when it will be disabled. And the same could also be enabled, if required. Some extensions are incompatible with the newer version of Firefox and could not be work. 

Most extensions require you to restart Firefox to be disabled. If you get a restart message, as shown in the below image, then click 'Restart now' link.


Note: Option button is not available for disabled extensions and the disabled extensions are moved to the end of the extensions list. 

If you like to remove an extension, completely, then open Add-ons Manager and search the extension that you want to remove from the list. Click the Remove button corresponding to the extension. If you get Restart message for removed extension, then click Restart now link to complete the removal process. 

Note: An extension can also be removed, when it is in disabled mode. 

Browsing Data: Firefox also keeps the tracks of sites that you've visited as files downloaded, cookies, and more. All these data were collected in the history and when the history database became larger and larger then Firefox will be slowing down or crashing. Firefox provides several methods to clear the browsing data.  

From Menu bar click History then select Clear Recent History from the drop-down menu. 

From 'Clear All History' dialog box (as pictured below), you can choose the deletion type as you wish. Select the boxes under 'Details' for the items you want to clear.
 
Note: If you choose 'Everything', a warning message will display and saying 'This action cannot be undone'.


Clear Browsing Data for a Single Website: If you like to keep browsing data for few websites, and not for others then you may choose selected data for the specific sites to clear browsing history. From Menu bar click History then select Show All History from the drop-down menu. 

The Library dialog box will display. From left pane of Library dialog box, choose the time frame (i.e.,Today, Yesterday and so on) that you visited the websites, and to clear the history. 


A list of websites, for the time you visited, will be displayed in the right pane (as shown above). Right click on the desired website in the list and select 'Forget About This Site' from the popup menu. If there will be a long list of sites, you can use 'Search History' box to find out the desired website. 

Note: Firefox doesn't provide re-confirmation message for this process while you delete the desired sites.
         

Clear Browsing Data  When Firefox Exits: To clear browsing data, automatically, when you close Firefox, from Menu bar choose Tools > Options.  

From Options dialog box, open 'Privacy' tab and select 'Use custom settings for history' under 'History' section.   

 
Now you'll be prompted for additional options as shown in the below picture.  Tick the box of 'Clear history when Firefox closes' then click 'Settings' button.  


Now 'Settings for Clearing History' dialog box will be opened; tick the boxes for the items that you want to clear when you close Firefox then click OK button. You'll be taken, again, to the 'Options' dialog box; click OK to accept your changes.

!!!HAPPY SPEEDY BROWSING!!!

Visit For CHROME: Happy Speedy Browsing - CHROME!

Tuesday, 11 June 2013

WINDOWS: Hidden Tools

WINDOWS: Hidden Tools

Windows contains a variety of system utilities that were well hidden and some were buried in the Start Menu, while others could be accessed by commands.
 
Most of the tools could be launched, easily, through Start Menu, if you know their names. For Windows 8, you should have to select Settings category from the Search Screen. 

This post will share some hidden tools of Windows, which were helpful to you!

System Information: This utility reveals the information of system and displaying everything from OS Name, Version, System Name, Model, Processor and so on. To get this utility just type System Information at your Start Menu (or Start Screen). 
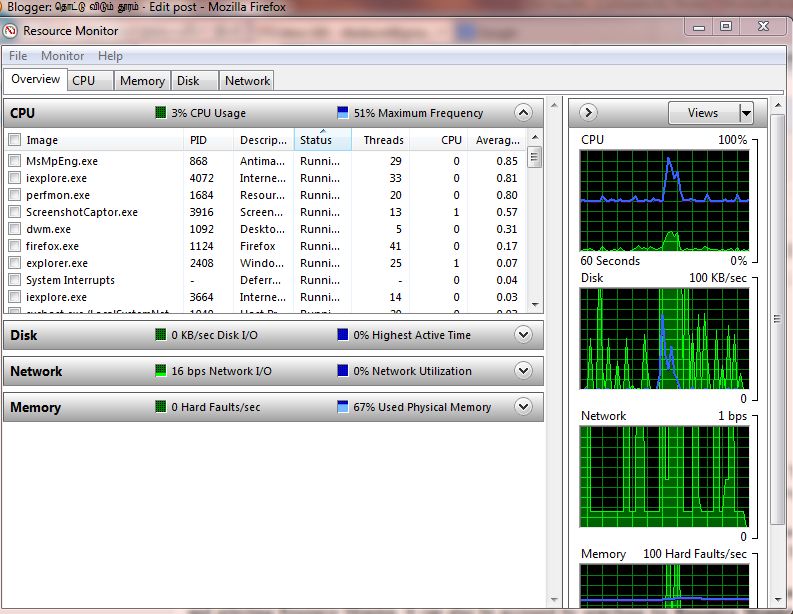
Resource Monitor: This application lets you view detailed real time information about hardware resources (CPU, Disk, Network and Memory) and system resources (including handles and modules). Through this tool, you can identify all the running processes; especially which process is working heavily on the system. In fact, this tool provides a statistical report of your system in which Task Manager would not doing so. Using this tool, you can start or stop services, analyze or stop running processes and so on. To launch this tool, just type Resource Monitor at your Start Menu (or Start Screen).
You can also get by opening Task Manager > Performance Tab, then select Resource Monitor.
        
Performance Monitor: This application is monitoring your system and gather performance reports. It helps you to view performance data either in real time or from a log file. To launch this application just type Performance Monitor at your Start Menu (or Start Screen).
Computer Management: Computer Management has variety of tools to manage your computer such as Task Scheduler, Event Viewer, Shared Folders, and so on. To access this tool, just type Computer Management at your Start Menu (or Start Screen).

  • Task Scheduler: allows you to view and customize the scheduled tasks of your computer. You can also create your own custom scheduled tasks.
  • Event Viewer: allows you to view and filter system events from software installation to application crashes and blue screens of death.
  • Shared Folders: displays the folders shared over the network on your computer. Its an useful interface to view what folders are being shared.
  • Device Manager: (a classic Windows Device Manager) allows you to view the devices that connected to your computer. You can disable them, and configure their drivers.
  • Disk Management: a built-in partition manager you can use without downloading any third-party tools.
  • Services: allows you to view and control the background running services in Windows.
Administrative Tools: Computer Management tool also found itself in Administrative Tools folder along with Event Viewer, Performance Monitor, Task Scheduler. To access this tool, just type Administrative Tools at your Start Menu (or Start Screen).
Group Policy Editor: It has variety of settings that were designed for system administrators  to customize and lock down PCs on their networks. It contains some settings also for average users to disable the lock screen and skip to the log-in screen directly. To launch this option, just type gpedit.msc at the Start Menu (or Start Screen) then press Enter.
Windows Professional or Ultimate editions only having Group Policy Editor option.

Registry Editor: is a hierarchical database, where Windows OS configuration settings and options are stored. The kernel, device drivers, services, profiling system performance, user interface and third party applications could make the use of registry. To access this option just type regedit at the Start menu (or Start Screen) then Enter. 

Advanced User Accounts Tool: provides some options like Manage Passwords, Advanced User Management Tasks etc., which were not available in the Standard Interface. To access this option, press WinKey+R to open Run Dialog Box and type either netplwiz or control userpasswords2 then Enter.
MSConfig: is a classic tool for System Configuration. This tool allows you to control the start-up programs on Windows and customizing your boot loader, which is an useful utility - if you've multiple versions of Windows installed. To launch this utility, just type msconfig at your Start Menu (or Start Screen) then Enter.

Windows Memory Diagnostic: is a built-in tool in Windows through which you can restart your computer and test the memory for defects. If you wish to check computer's memory for errors, just use this utility (not required a third-party tool). To activate this tool, just type windows memory diagnostic at your Start Menu (or Start Screen).

Disk Cleanup: will scan and clean-up your system for the temporary files, offline webpages, temporary internet files, memory dump files and so on. Some cleaning utilities will also do this job, and CCleaner will be prefered by advanced users. However, Windows Disk Cleanup is a default tool, which doing a good roll. To access this tool, just type disk cleanup at your Start Menu (or Start Screen).


Sunday, 26 May 2013

Why Should We Use Google Docs or Office Web Apps - Instead of Microsoft Office!

Why Should We Use Google Docs or Office Web Apps - Instead of Microsoft Office!

What is Google Docs? It's a freeware and web based office suite offered by Google within its Google Drive service. It allows the users to create and edit documents online while collaborating in real time with other users. Google docs can be viewed on many devices such as smartphones, tablets by adding appropriate Apps.
google-docs-and-office-web-appsMicrosoft also offers their own free Office Web Apps that compete  with Google Docs. Microsoft, often, releases new versions, and recently they launched Office 365 and Office 2013, a subscription service. 
Office 365 costs $9.99 per month and $99.99 a whole year while Office 2013 will cost you $219.99 for the Home and Business editions, which can only be used on single PC at a time.
So, before open your wallet you've to consider whether you really need Microsoft Office, a subscription service or Google Docs, which is totally a free service! 

Please keep also in your mind that a full desktop version of Microsoft Office will be packed with lot of features and most of those you wouldn't found in Google Docs or even on Web Apps of Microsoft Office. But, through Google Docs you can exported your documents to Microsoft Office formats and PDF files. 

Advantages of Web Based Office Suite: Both suites of Web Based Office are available anywhere with collaborative features to allow the users to work on any document and as well over Internet on the same document. To work on Web Based Office is not required to install office suite software on your PC; just log into your browser then started to work on any PC. The documents, you're working, will always be sync across desktops and laptop whatever you're using, and even you can access them on smartphones or tablets. In fact, they're stored online as a master copy and nothing to worry even your system's hard drive is corrupted.
During Offline Mode: Microsoft Office Suites would not be working to access the online stored documents during offline mode such as facing problems with your Internet Service Provider (ISP) or driving on a subway tunnel or on an airplane. But Google Docs offer offline supports through Google Chrome only. Using Google Chrome, you can enable offline access of Google Drive and able to view, edit, create documents or spread sheets, presentations and even the drawings in offline mode. The changes you made, in offline mode, will be synchronized when you connect to the Internet. The Web Apps of Microsoft Office doesn't offer any offline functionality; unless you should have a full suite of Microsoft Office on your desktop to edit offline documents. So, Google Docs can be accessed from Google Drive that supporting offline mode, auto saving and with other features while Office Web Apps integrates through SkyDrive of Microsoft that still not support offline and other features.
FREE Alternatives: Most of us, obviously, thinking that Google Docs or Office Web Apps are the only sources for Web Based Office Suites in computer's technology. But, there were also plenty of alternatives available and I'd like to prefer two free office suites.  


Abiword  is a free word processing program similar to Microsoft Word. Allows you to collaborate with multiple people on one document at the same time and lets you store documents online, allows easy document sharing with your friends, and performs format conversions on the fly.             
LibreOffice: is a free stable version of office suite with wide variety of new features for its users as well as several important changes and improvements under the hood.   

Tuesday, 21 May 2013

Windows: Freeing Up Hard Disk Space


Windows: Freeing Up Hard Disk Space 

Nowadays the Hard Drives are going larger and larger in capacity, because they always need to filled up with data, software applications, photos, video clips and etc., 
Here I'd like to share some tricks (or tips) to free up more space by removing unimportant junks and cluttering up the hard disk. 

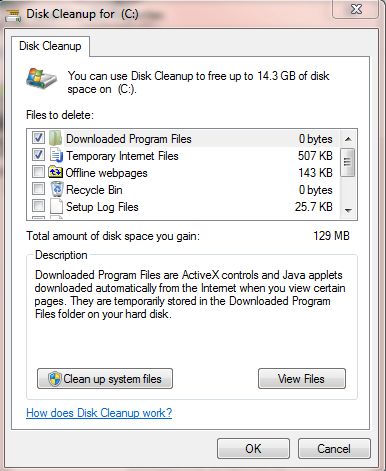
Run Disk Cleanup: Windows, by default, has a built-in Tool, which deletes the temporary files and other unimportant data. To access the Tool, right-click one of your hard drives in the Computer window then select Properties.   
Now click Disk Cleanup button from Properties window. 
Select the files that you wish to delete then click OK. This includes Downloaded Program Files, Temporary Internet Files, Offline webpages and so on. You may also clean the system files by click the button of Clean up system files.

After click Clean up system files button, a tab More Options, will be added in the same Disk Cleanup window. From More Options tab, use Clean up button under System Restore and Shadow Copies to delete system restore data.
This process will delete all the restore points except the most recent one. Before using this option, make sure your computer is working properly because you would not able to use older system restore points. 

Uninstalling Programs will also be freeing up Hard Disk's space even some programs occupying little space. The process of uninstalling programs could be accessed from Start>Control Panel>Programs. All the installed programs will be displayed with details of Name, Publisher, Installed date, Size and Version of Program. 
To uninstall a program, move the mouse pointer over the program to highlight then right click. A label Uninstall will be displayed then click on it and do the rest as system is asking you to uninstall the particular program.      
 
Actually some programs may not showing accurate amount of space they occupied. Using analyzing disk space process will reveal you what exactly using space on your hard drive. This process will scan the hard drive then display which files and folders are taking up the most space. 

There were some best tools for analyzing hard disk space.
  • WinDirStat reads the whole directory tree once and then presents it in three useful views:
    1. The directory list, which resembles the tree view of the Windows Explorer but is sorted by file/subtree size,
    2. The treemap, which shows the whole contents of the directory tree straight away,
    3. The extension list, which serves as a legend and shows statistics about the file types.

    • SpaceSniffer is a freeware and portable tool application that lets you understand how folders and files are structured on your disks.
    • Disktective  is a freeware utility (for Windows and Linux) to trace out the used disk space on your system then reports the real size of your directories and the distribution of space inside them. A directory may contain hundreds of subdirectories and each of them containing thousands files. Run this utility and let to create a complete report displaying the real sizes of all directories and their containing subdirectories. This tool doesn’t want to be installed, but you could carry it on a USB drive to analyze the flash drive itself or any Windows computer you come across.  
    • DiskSavvy is a fast, easy-to-use tool, which allows to analyze disk usage for your hard disks, network share drives, and NAS storage devices. This tool is available in three versions as freeware, Pro and Ultimate. The freeware version allows for a maximum number of files of 500,000 and a maximum storage capacity of 2 TB. It has support for long filenames, Unicode filenames, and UNC network path names and allows you to copy, move, and delete files directly within the program. 
    • GetFoldersize scans unlimited number of files and folders on internal and external hard drives, CD's, DVD's, and shared network drives then displays the total size for all the files in that folder or drive and the number of files and subfolders within the folder or drive. This application is available in portable version; so, carry it with you on a USB flash drive or other external drive. 
    • Scanner uses an extended pie chart with concentric rings to display the usage of the space on your hard drive, external drive, network drive, etc. It is a portable program and comes with two text files (one of them in English) that describes the usage of the program.  
    • Free Disk Analyzer displays the drives in a tree structure, like Windows Explorer, and allow to drilling deeper folders and files. The right side of the window displays all the subfolders and files to the selected folder or drive. This also displays the usage of disk in a pie chart at the bottom.
    • RidNacs is a fast analyzer that scans local drives, network drives, or a single directory and shows the results in a tree view with a bar chart displaying percentages.  
    • TreeSize Free is a freeware, which works on  Windows XP / Vista / 7 / 2003 / 2008 (32 or 64 Bit) and users of Windows 2000 can download the last compatible version. It tells  you 'where precious disk space gone!' It can be started from the context menu of a folder or drive and shows you the size of this folder, including its subfolders. Scanning operations run in a thread and all results can be drilled down to the file level. This freeware can be downloaded as a portable or an installable file. To get the option on context menu, you should download the installable file then install the program. 

    Cleaning Temporary Files: By default, Windows 'Disk Cleanup Tool' is an useful one to freeing up the spaces; but it does not delete the temporary files that used by other programs such as Chrome or Firefox browsers.  I recommend an aggressive popular application CCleaner that clears the temporary and junk files from a variety of third-party programs and in addition, it cleans the Windows files, where Windows - 'Disk Cleanup Tool' would not reached. To know CCleaner's activities visit: How To Use CCleaner Like A Pro?   

    Find and Clean Duplicate Files: Duplicate Files are saved in hard drives and occupying more spaces. These types of files are unnecessary and can be deleted. A free version of tool, dupeGuru, will help to find out the duplicate files on your computer by scanning either file names or contents. This version runs on Windows, Max OS X and Linux. Do whatever you want with your duplicates that dupeGuru finds for you not only to delete, but you can also move or copy them elsewhere! dupeGuru offers multiple ways to filter and sort your results to easily weed out false duplicates.

    Thursday, 9 May 2013

    How to Block Cookies Except The One You Used For Sites

    How to Block Cookies Except The One You Used For Sites

    Cookies are small piece of data or file, which was sent from a website, then stored in system, while a user is browsing a website. When the user browses the same site in later times, the stored data of cookie(s) has been retrieved and notify the website for the previous activities of the user. Cookies either carrying not viruses, or installing mal-wares. 

    Cookies are useful for our browsing experiences such as saving time from the hassles of logging sites every time, storing our shopping cart info and so on. The disadvantage of cookie is they're doing a bad roll as to track and gather the info of the user, without his explicit knowledge, then helping the advertisers to built profiles of user.

    Through this article, I'd like to share 'how could we restrain the cookies from its misbehavior, except the one we actually need for our work!' 


    Internet Explorer:  When using IE, we've to look two main things that were:

     
    1. managing site status i.e., to white-listing a site and 
    2. toggling cookies acceptance.

    To make white-listed a site, click on Tools>Internet Options>Privacy>Sites

    Now a dialog box named 'Per Site Privacy Actions' will be opened. From this dialog box you could arrange the website status as to white or block.
    Filling of every  white-listed sites, by manual, is an inefficient way unless using semi-automated process will toggle the cookies setting. To use the semi-automated process, go again Tools>Internet Options>Privacy then click Advanced button. A dialog box, 'Advanced Privacy Settings',  will be opened like pictured below.
    From 'Advanced Privacy Settings' dialog box, you could toggle the cookies setting, by using the radio buttons of First-party and Third-party cookies. Temporarily, turn on the First-party Cookies to Prompt mode and Block the Third-party Cookies.

    Rather remembering every site to be added in whitelist, this process helps to accept the cookies in the basis of need-to-use as they appeared. Few days later of your browsing, you'll come across the sites you used,  regularly, will be added in the white list, which is in the basis of need-to-use. Now, you can toggle the sites to Prompt mode or to Block - if the sites, you found, really nuisance.        


    Mozilla Firefox: has built-in controls, by default, to manage the cookies.


    We've to go through the built-in controls to manage the cookies. 

    Click Tools>Options then click on Privacy Tab. 

    Now under History, open the drop down menu of Firefox will .... and choose 'Use custom settings for history'.  

    Now remove the tick mark from the box of Accept third-party cookies, then the drop down box of Keep until  be toggled to ask me every time and press OK.

    After this process, you will be prompted every time for the cookies, which attempting to lodge into your browser, to be allowed or blocked. As for the prompting method, you may come across to the sites that you've allowed will be in white listed. 

    Through Exceptions button you may view the cookies list, which has entered manually. The button Show Cookies will reveal you the detailed reports of cookies and able to delete manually as you wish. 

    A Firefox link, cookies manager plus will allow you to explore deeper the cookies such as editing, import / export and etc.,


    Google Chrome  

    Cookie Settings could be accessed from Chrome's Settings (page). Settings (page) then go down for Privacy. Under Privacy, click and open Content settings... button.  


    Content settings window will be opened, as pictured below, and it has few options under Cookies.

    - Allow local data to be set (Recommended) - means, allow all cookies.

    - Keep local data only until I quit my browser - means, keep all cookies till browser's exit.  

    - Block sites  from setting any data - means, block all cookies.

    - Block third-party cookies and site data - means, allow first party cookies to be set and block all third party cookies.

    Now you've limitation of abilities over on these four options, and make tick 'Block third-party cookies and site data', which allows first party cookies to be set and block all third party cookies. 

    Installing an add-on, Vanilla Cookie Manager, will automatically (or manually - if you prefer) remove unwanted cookies  and allows to select the cookies that you wish to keep as whitelist.


    Vanilla Cookie Manager will filling up the gaps of Chrome's cookie management toolbox by allowing an easy whitelist management service as you visit the websites will have a small white cookie in the address bar. Click over on the icon to allow as to whitelist or block from the site. In addition, Vanilla Cookie Manager will also delete the unwanted cookies and save the whitelisted cookies from deletion.