Tuesday, 12 April 2016

The History: Back Slashes and Forward Slashes

The History: Back Slashes and Forward Slashes

Have you ever noticed that 'why Windows uses back-slashes for paths, while everything else seems to use forward-slashes'?

In Windows, C:\Windows\ (back-slashes) and everything others, http://portonovocomputertech.blogspot.com/ on web, and /home/user/ on Linux, OS X, and Android (forward-slashes).

And it doesn't matter what type of slash you use, but the modern software, automatically, tries to correct when you type a wrong slash! 

The History: 
Why Windows uses back-slashes?  
It’s all around a few accidents of history, which happened decades ago.

Unix has introduced the forward slash character ( / ) as it's directory separator in 1970's. And we don’t, really, know 'why they chose this character', but that’s the one they picked. 

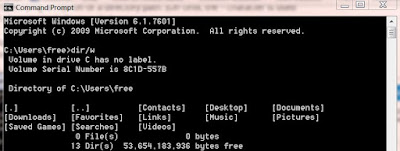
The original version of MS DOS 1.0 did not supporting directories at all, when it was released in 1981. Most of it's utilities were written by IBM, and they used the / character as a 'switch' character. We can, even, see this character today in the command prompt, i.e., to run the command dir/w tells the directory command to run with wide list of format option, while run the command  dir c:\ tells  the directory command to list the contents of drive C:\.  The different types of slashes here indicate whether you’re specifying an option or a directory path. 

MS-DOS 2.0 introduced support for directories, but IBM wanted to keep compatibility with the original DOS utilities and other programs that expected the / character to be used for switches. Microsoft had already used the / character, so they couldn’t just re-use it. They ultimately chose the \ character instead, as it was the most similar-looking character visually.

Windows may not be built on top of DOS anymore, but you can still see the legacy of DOS throughout Windows in the way backslashes and other features like drive letters are used for the file system.

Many of these details are from Microsoft employee Larry Osterman’s weblog, which contains more detailed information from Microsoft employees who made these decisions.

These all would not be the matter today, but web browsers follow the Unix convention and use / characters for web page addresses. A typical Windows user sees a forward slash when they type a web address and a back slash when they type the location of a local folder; so, this can be confusing. Websites follow the Unix convention, as do other protocols like FTP. Even if you’re running a web server or FTP server on a Windows machine, they’ll use forward slashes because that’s what the protocol calls for.

Other Operating Systems (OS) are using forward slashes for the same reason; it’s the convention of Unix. Linux is a Unix-like operating system; so, it uses the same type of slash. Mac OS X is based on BSD (Berkeley Software Design), an another Unix-like operating system. Other consumer operating systems like Android, Chrome OS, and Steam OS are based on Linux, so they use the same type of slash.

The more interesting question is, here, whether it really matters or not? Browser and OS developers seem to realize that the users are confused; so, they often go out of their way to accept any type of slash possible. 

If you type http:\\portonovocomputertech.blogspot.com\ into Google Chrome, Mozilla Firefox, or Internet Explorer, the browser will automatically correct it to http://portonovocomputertech.blogspot.com/ and load the website normally. 

If you type C:/Users/Public into Windows Explorer and press Enter, it will automatically be corrected to C:\Users\Public and you’ll be taken to the correct location.

DOS developers weren't satisfied with this in the earlier days; so, they made DOS to accept both types of characters for paths. Even you may type commands like C:/Windows/ into the Command Prompt, today, and you’ll be taken to the correct folder.

This doesn’t work everywhere in Windows, if you type a path like C:/Users/Public into the Open dialog and press Enter; you’ll see an error saying that the file name isn’t valid. Other web-based applications may show you the error if you attempt to type a path like http:\\portonovocomputertech.blogspot.com\ it depends whether the program corrects it for you or decides to display an error.


You can just forget that there are two different types of slashes, but it occasionally does matter. It would be nice if everyone used a consistent separator for directory paths, but Windows has historically been all about backward compatibility, even in the early 1980's.

Sunday, 10 April 2016

How to Check If Your Android Device Is Working Properly?

How to Check If Your Android Device Is Working Properly?


There are a lot of components, which make to functioning your smartphone, and if one of those is not working properly, it may throw off your whole effort.


But how do you pinpoint exactly 'what’s wrong with your device?'. May be the accelerometer seems a bit off when you play racing games, or when browsing the web on Wi-Fi / mobile data, you don’t feel the speed as fast as it should. 

Whatever the problem is, there are apps that can help you to figure out the wrong side and how to solve it. Even if you’re not having a specific problem, it might be good, as a routine work, to run through a little check-up on your phone to ensure everything is running smoothly.


1. Device Assist
The App, Device Assist, is from the Play Store, which does a lot more than check for issues. If you're a beginner, it will give tips and advices on how to take advantages to your Android device; but if you've Nexus or Moto devices, you should have to download the APK and install it manually.


When you boot up the App, it asks if you want Basic, Intermediate, or Advanced mode, and this can be changed, later, from the Settings.


Beginners will be told how to turn Wi-Fi on / off, or create folders on their home-screen (pictured above), whereas advanced users will learn about more obscure features like finding or remote locking your device (pictured below).


Navigation is simple, just scroll through the list of cards that Google displays for you. At any time, you can search for a particular issue in the top right, or tap the three-dot icon to see previous actions you’ve taken, change your settings, or view a range of information about your device.

You can even check the Wi-Fi or data speeds, and Google will tell you the results in plain English so that you actually understand the results.


Since the App is a part of Google’s services, it provides hints for other Google Apps too, like little tricks for Google Maps. All the tips are explained in easy-to-understand instructions and visual explanations in GIF form, if necessary.


So, this App is simple and offers good solutions, if your smartphone facing problems.


2. Test Your Android

Have you any idea on this App Test Your Android, which is also available in Google's Play Store and it tests your Android device, too. This powerful App having an attractive colorful interface that allows you to test everything from your screen's multi-touch capabilities to your built-in compass. You can also slide to Information tab to view your device information like Device Assist App.

A small ad can be seen at the bottom of this App while you use it, but it's easily ignored.


3. Phone Doctor Plus 
As the name imply, the App PhoneDoctorPlus diagnostics as a doctor for your phone. It allows you to run through all sorts of 'check-ups' to ensure that everything works properly.


As your expectations, this App allows to check-up the health and status of various aspects of your device such as CPU, memory, compass, battery and etc., When you completed the various tests, the progress bars will be filled-up.


The date on which you're tested the each part of device will also be noted. So, you always have a record for different aspects.

4. Z Device Test
This App, z device test is not the prettiest one, but it is so functional. It uses big 3D skeuomorphic icons with tiny text beneath them.


However, it provides very specific and detailed information about everything from accelerometer to GPS coordinates. It shows a big green check mark on sensors and features that your phone equipped, and a big red X mark through any that your phone is lacking.
Banner ads run along the bottom of the screen, and sometimes interrupting by full-screen. But if you need the kind of detailed information this app can supply, those might be worthful.

Fixing Pixels Of 
Defective or Dead
Above said Apps will help you to detect the problems and solve! But, if your device has a defective or dead pixel, they doesn't do anything in fixing it. Some stuck pixels are hardware related defects, and those can’t be fixed by any App, but others just need to cycle through their three options (red, green, and blue) enough times to refresh them.


If you find that your screen has a stuck pixel (or more) then there might be a way to revive it.


5. Dead Pixel Detector & Fixer
If you want to try through the App route, then you could use Dead Pixel Detector & Fixer, which gives you different color backgrounds to identify dead pixels, then shuffles the whole screen rapidly through colors to refresh any affected areas.
The best solution to solve this, is not an App, but through a website: JScreenFix, which works on Android or any other device with an LCD panel. It displays a pure black screen so that you can identify the stuck pixel, then it offers a little square that you can place over the area that quickly shuffles through colors. Developers suggest leaving it running for about 10 minutes.


What App Do You Use?

There’s a flurry of Apps available on Play Store for checking the health of your Android devices; but above said were the best and personally, we suggest Google's Device Assist to be the best option for most people, as others will need the detailed readouts, like Z Device Test.

Monday, 4 April 2016

How To Clean And Sanitize Your Smartphone

How To Clean And Sanitize Your Smartphone

Years ago, the London School of Hygiene and Tropical Medicine found that 92 percent of phones tested had bacteria on them. It sounds frightening, but that’s par for the course for being a bunch of evolved animals with gadgets in hand. That’s also why we sought to find out how the heck to properly clean a smartphone. 

Here’s a couple of tips we learned along the way.


Make a habit of wiping it down!


This is an obvious thing to do but it bears repeating: you should wipe down your phone as often as you can. We love pre-moistened anti-bacterial wipes like Wireless Wipes or these stylish screen cleansing towelettes from Sephora, but you can also buy full size screen cleaning and microfiber phone cleaning kits to keep at home. 


Alternatively, you can make your own screen cleaning solution from scratch. All you need is a small spray bottle, 8 ounces of 70 percent rubbing alcohol, and 8 ounces of distilled water. (Make sure that it’s distilled water. Tap water can leave behind a residue.) A 50-50 mixture of white vinegar and distilled water also works, if you want to keep things organic and don't mind the odor.


Bust out the Q-tips and toothpicks!

Those tiny crevices in between the glass covering the display and the rest of the chassis store lots of gunk. My friend’s favorite thing to do on a Sunday afternoon is go through and pick at them with a plain wooden toothpick. It’s pretty disgusting to see what he excavates from the cracks in his smartphone, but he’s a contractor and that’s the only way to ensure his device stays relatively clean.


Try this yourself and, when you’ve finished, run through the cracks again with a dry cotton swab to clean out any residual dust. For tougher jobs, you can take a fresh cotton swab, dip it in cleaning solution and swirl it around on the camera lens and other parts of the smartphone chassis. Be thorough, but also be gentle; you don’t want to accidentally scratch anything.


Consider investing in a UV sanitizer!

If you’re really a germaphobe, you can invest in a device that kills off germs with a UV light. Try out CellBlaster’s Universal UV Cell Phone Sanitizer, or the Easycare Portable Multiuse UV Sterilizer. But honestly, killing germs with UV light is sort of hit-and-miss and you still don't get the crud off.


Don’t forget to wipe down your headphones, too!

If you opted for the UV blaster mentioned above, you can simply drop your earbuds in and take care of business that way every few days. If not, you can wipe each bud down with a soft cloth dampened with a bit of mild dish soap and water.


Headphones are a bit trickier: you’ll want to use same dish soap solution to wipe them down in their entirety. If the headphones include silicon covers, you can remove those and clean them separately with a toothbrush. Anything more serious, and you’ll want to dip a cotton swap in rubbing alcohol and give it a thorough once-over. Then allow the headphones to dry completely before using them again.